Do you know how easy it is to create and publish content online? With WordPress, it’s so easy that there aren’t many good excuses left for not publishing regular (or even semi-regular) content.
But no content management system is perfect, and WordPress is no exception!
While publishing on WordPress is easy and beginner-friendly, managing content with it can be frustrating. Trust us, we’ve experienced these frustrations firsthand. With each frustration, we’ve discovered the best way to resolve it and are sharing our best content publishing tips and tricks below.
Why is the incorrect image displayed after sharing my post on social media platforms like Facebook and LinkedIn?
Some social media platforms cache shared content for faster loading times, storing the initial information to use again and again. This frustration typically occurs after publishing your content on WordPress and posting it to a social platform. If the featured image has been updated after your initial share, LinkedIn and Facebook might still display the old, cached image.
Try LinkedIn’s Post Inspector tool (formerly LinkedIn Debugger) to clear your URL’s cache. Enter your URL into the tool to force LinkedIn to re-scrape the page and update the image.
Like LinkedIn, Facebook has a Sharing Debugger tool that crawls your page and lets you see the information Meta uses when displaying your content on Facebook and its other platforms. If you’ve made updates to several pages, try their Batch Invalidator to check multiple URLs at once and refresh their cache.
If you used either of the tools above and the incorrect image is still displaying, check that the image you’ve used meets the platform’s criteria in size and format (for example, JPEG, WEBP, or PNG). Check out LinkedIn’s and Facebook’s guidelines for images.
I have copied my content to WordPress from another source, and it isn’t displaying correctly. Why?
You’ve written a lengthy post and copied it over to WordPress, but you’re dismayed to find that nothing looks right. Either the font family is incorrect, the text is the wrong size, or it’s using the wrong font-weight (to name a few common issues).
If your content isn’t displaying correctly, it could be because of formatting issues. While you can copy and paste content from external sources (such as Microsoft Word, Google Docs, or a web page) into WordPress, it can also bring with it hidden formatting code that WordPress doesn’t recognize.
There’s an easy way and a hard way to fix this issue. But we’ll just tell you the easy way, however, it does require some fancy fingerwork.
Depending on your browser or system, the tool we’re talking about can be referred to differently. But at SiteCare, we like to call this move “The Claw.”
How to copy over content the right way
This tool is typically called Paste Values or Match Destination Formatting. To use either of these tools, use Ctrl+Shift+V.
On Mac, use the Paste and Match Style tool. Depending on your browser, this can be Cmd+Shift+V or Cmd+Opt+Shift+V (Safari).
Still, using the Classic Editor? The Paste as text option in the toolbar should solve any carryover formatting problems you might have.
Gutenberg Blocks has made many improvements over the years to make publishing on WordPress a breeze, and one of those improvements is the ability to copy content over without the fancy fingerwork.
You can retain your headings, paragraphs, links, etc from the original document easily with Cmd/Ctrl V without carrying over any unwanted style classes. This is not perfect, so it’s always a good idea to double-check your content to ensure the formatting is correct before publishing. Check out our Gutenberg guide if you’re still not convinced to make the switch from Classic Editor.
The last viable option is to paste the content into a plain text editor to strip out any extra formatting before copying it into WordPress.
Alternatively, you may be experiencing plugin conflicts that are interfering with your content display. The best way to solve this is to test your plugins by deactivating them one by one and reviewing the page for changes.
Why are my images all different sizes and alignments when I view the page in Preview?
First, check the dimensions and alignment for each image on the page.

In Gutenberg, this can be done by reviewing the Image Block settings from the sidebar. In the Classic Editor, click on the image and select the pencil icon. If they’re not all the same, resize and realign them, save, and try loading the page again.
If that doesn’t work, check your WordPress theme’s settings. The theme might apply different styling rules to images, which affects their size and alignment; choose the appropriate image alignment options to resolve this. However, remember that theme settings are global settings, so a change there can affect the rest of your site.
If the default settings don’t provide what you’re looking for, you might need to adjust your images’ size and alignment manually. To do this, you’ll need to edit the content as HTML and apply the correct height and width. If you can, set a uniform alignment for all images.
If your theme applies Responsive Design to your page, it may also resize your images to accommodate different screen sizes. To adjust this, define your image’s width and height in the CSS. You’ll may want to consult a developer for this fix.
I’m struggling to adjust the content width in my blog posts. Why?
Buckle up because this question has several answers. Content width issues can be caused by various things, such as block settings, custom CSS, your theme, or the template you’re using.
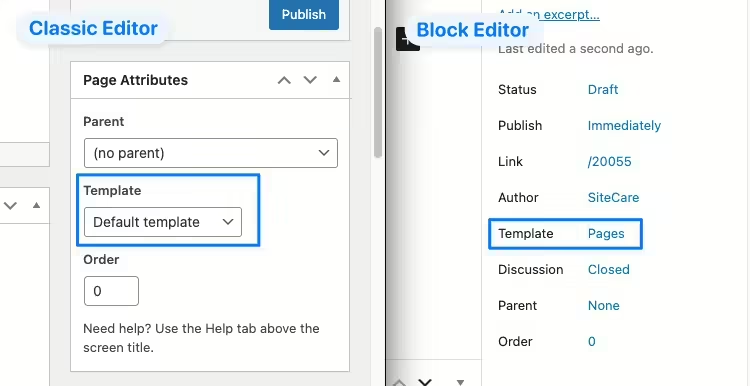
First, check which template you’re using.

Many WordPress themes come with different templates to use for the various layouts on your site. Each template can have different margins or styles and include sidebars or other elements on the page. Making sure you’re using the right template is the first step in checking your content width.
Is it a widespread issue? Consult your theme or the Site Editor

If this issue is widespread on your site, it may be related to a setting within your theme or the Site Editor for block-based sites. These may have specific settings for content width that are causing the problem. Alternatively, your page template’s settings can be the source of the issue.
Review the template settings in Site Editor and/or the settings for your theme to make sure they’re set up correctly. If no settings are available you may need to review the stylesheets for your theme to locate the culprit.
Is the issue specific to the page you’re on?
If the rest of your site looks perfect, but the margins on the page you are on are wonky, and you’ve double-checked you’re using the right template, you might have an issue with custom CSS or individual block settings.
Check where your theme stores custom CSS. This can be found in the customizer for themes still compatible with the Classic Editor or in the Site Editor for Block-based themes. If the problem lies in your custom CSS or you need to edit your theme’s CSS, we recommend only doing so if you’re experienced and confident that you can fix it. We’ve mentioned that publishing on WordPress is easy, but an inexperienced change to CSS can lead to issues across your site.
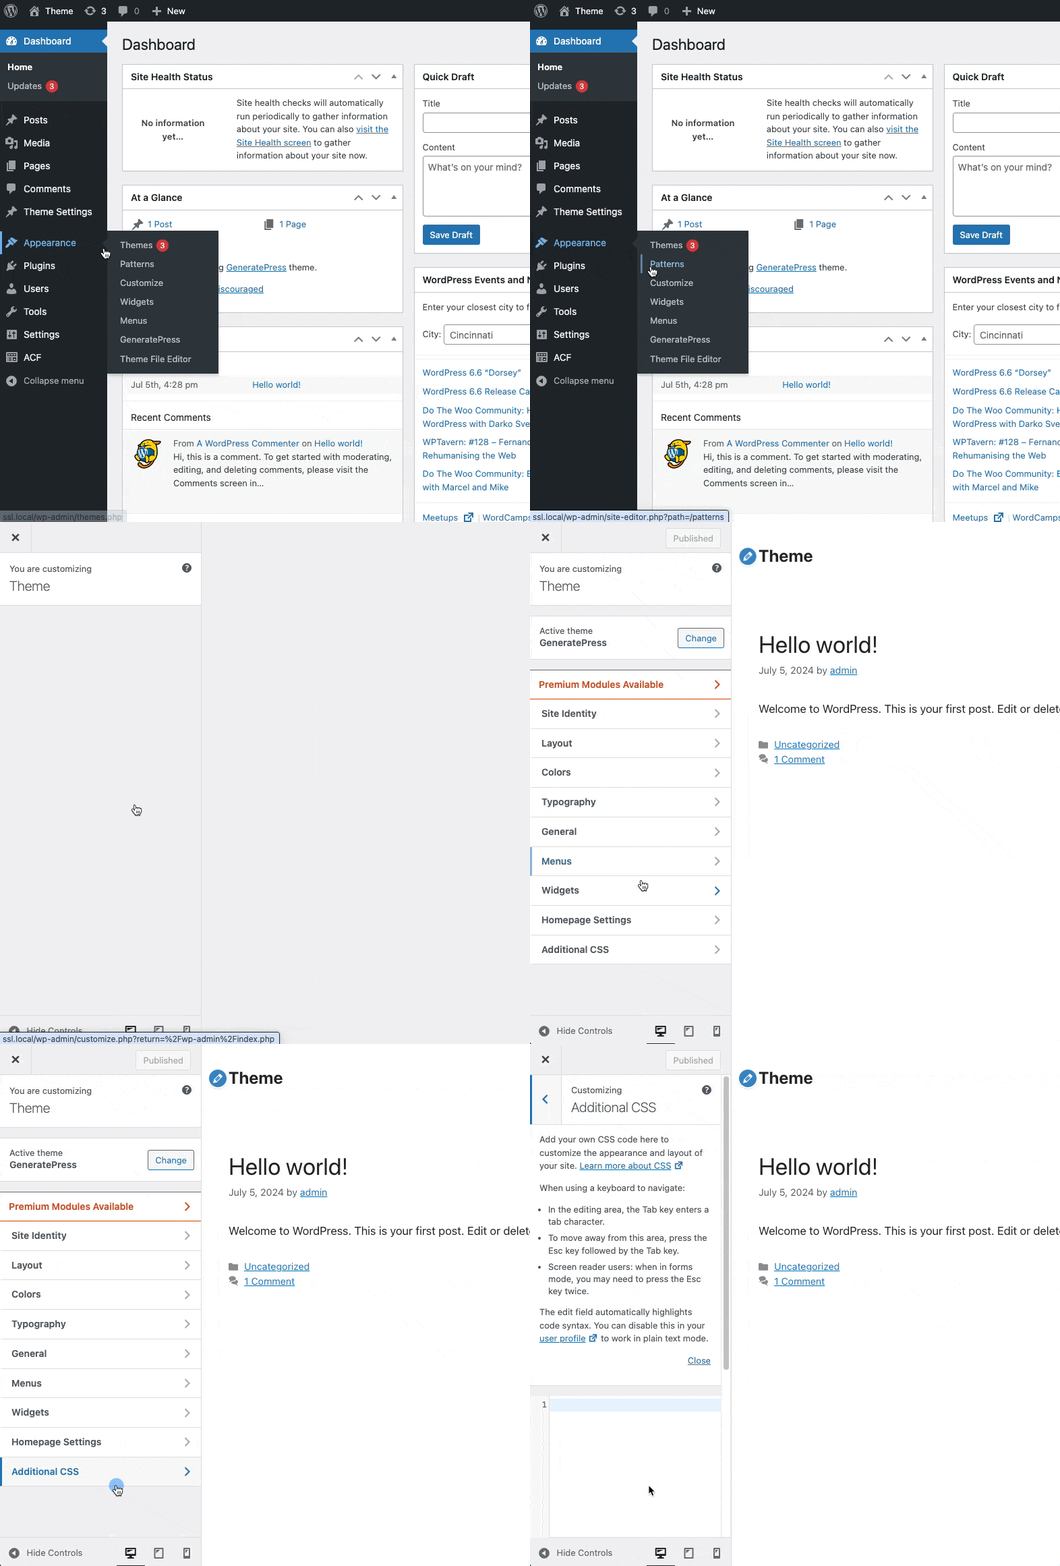
Finding Additional CSS for themes using the Customizer
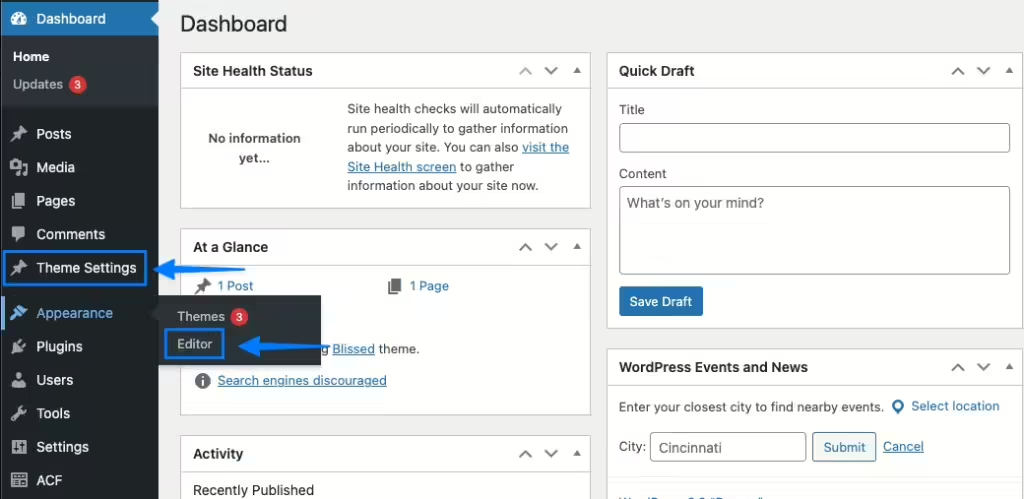
To find Additional CSS for themes using the Customizer, from the WordPress dashboard go to Appearance and then Customize.

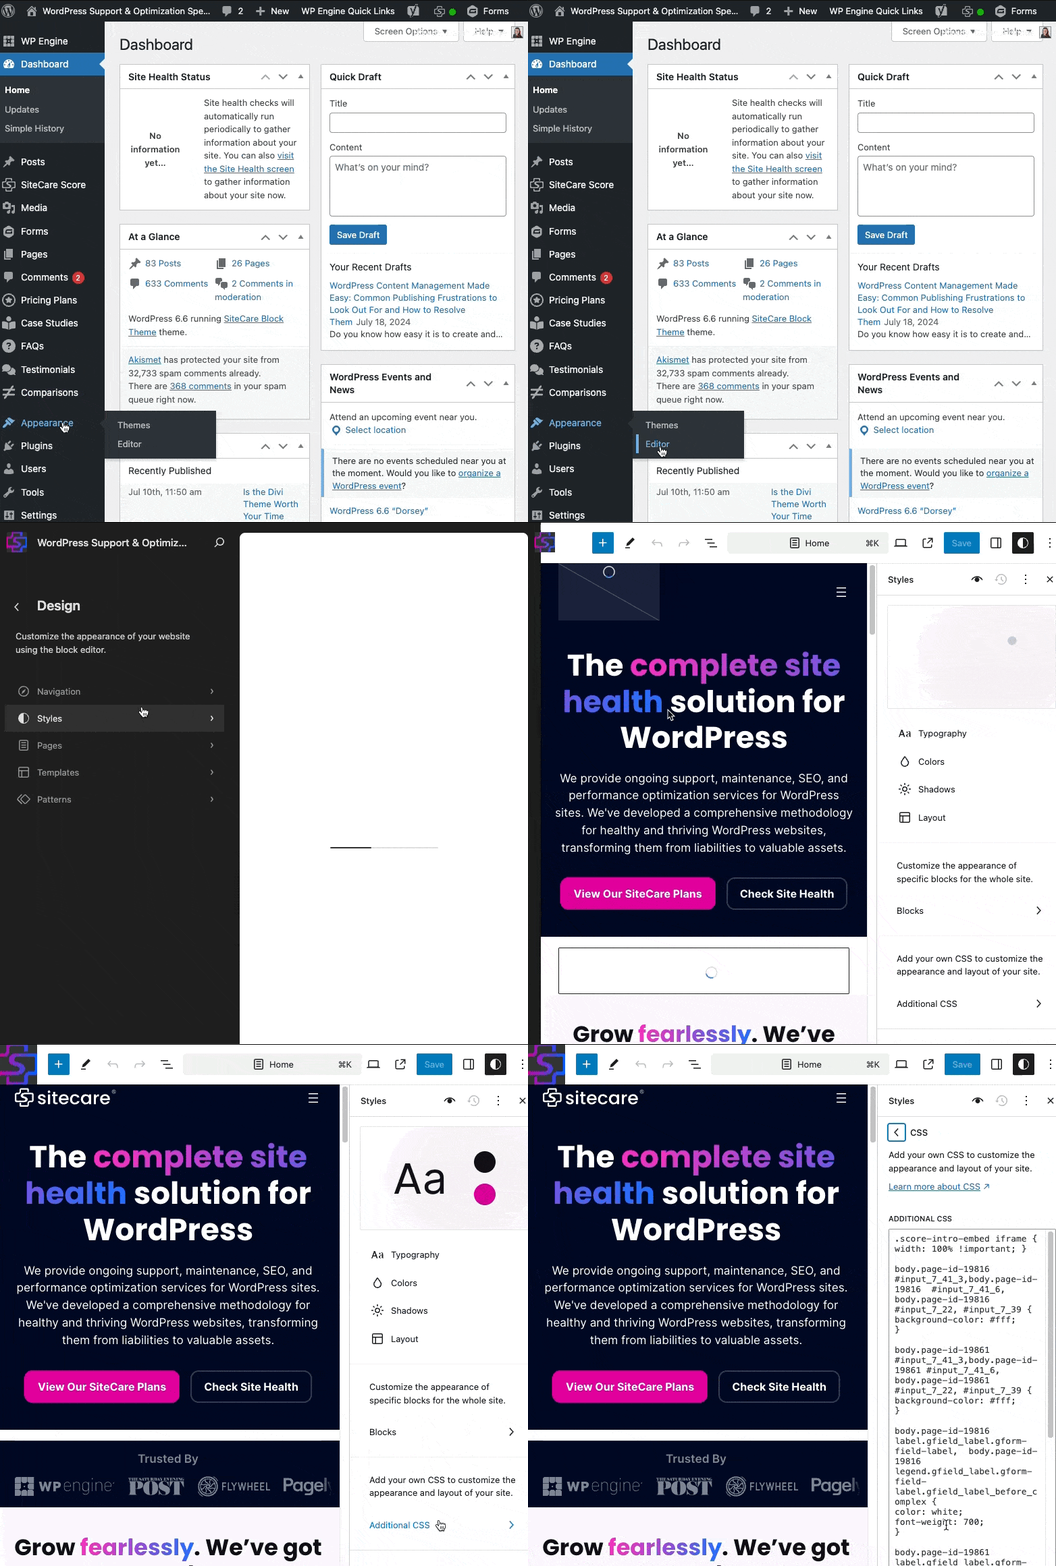
Finding Additional CSS for themes using the Site Editor
To find Additional CSS for themes using the Site Editor, from the WordPress dashboard go to Appearance and then Editor. Select Styles and in the side bar scroll down to Additional CSS.

If you don’t have custom CSS, check each block on the page and confirm the blocks are configured correctly. You may need to check the Content Width or Dimensions settings depending on the block you are using.
Why are my changes not showing up?
After publishing a page on your WordPress site, you’ve made extensive changes and hit Update but when you view the page later on, you still see the old version.
Nine times out of ten, this is due to caching.
First, check the page in an incognito window. For good measure, add ?no-cache to the end of the URL like this: https://sitecare.com?no-cache. Can you see your changes? If yes, good news! You just need to clear the cache.
Clearing your cache can be a multi-step process, depending on your WordPress configuration.
- Clear all plugin caches first. If you’re using an optimization plugin like WP Rocket, this should be the first place you check.
- Then, clear your server cache. This is the cache stored by your web hosting provider. Some providers include the ability to clear your cache from the WordPress dashboard, while others may require you to log in and clear it from the hosting dashboard.
- Lastly, if you’re using any CDNs like Cloudflare, clear that cache last.
Check your page again. If at this point your changes are still not showing up, it may require extensive troubleshooting.
There are blank spaces between my WordPress blocks. How do I remove them or add more?
Too much or too little space between blocks can change the overall look of your web page. If you want to add space between your content blocks, use the “Spacer” block. This will give you the extra real estate you’re looking for, and you can adjust the height by dragging it up or down. If you change your mind, simply delete the block.

Alternatively, try adjusting the padding and margins of the blocks from the settings in the right sidebar.
Removing the blank spaces altogether is a little trickier and may require adding custom CSS to your theme. First, check the margins and padding for the block you’re working with and the blocks around it. Then, double-check to make sure there are no rogue spacer blocks present. Add custom CSS or adjust your theme and Site Editor settings only if necessary.
The WordPress support forum with developers, plugin creators and experienced WordPress users is an excellent place to find solutions to most WordPress content problems. As always, don’t attempt a more complicated fix unless you’re confident you can get it right.
How do I ensure I’m editing the right block when working with Group or Column blocks?
We love the Block Editor but can admit it’s sometimes difficult to locate the correct block to edit. To get the right layout, you sometimes have to place blocks within other groups or columns. Sometimes, group or column blocks are nested within other groups or columns! This block-ception can get confusing quickly but, never fear, you can do one of two things when trying to select the right block to adjust settings.

When you select a block, a toolbar will pop-up like in the image above. The icon highlighted as B is the current block you’re on, and the icon highlighted as A is the block your selected block is within. Keep selecting icon A until you have selected the correct block.

Another way to select the correct block is by using the Document Overview feature (pictured above). This will outline all the blocks within your document so you can easily view and select the block you wish to edit.
Managing Content Made Easy
Despite some hurdles, publishing on WordPress is about as easy as it comes. Users can effortlessly create and publish content in WordPress, using intuitive tools and flexible editing features.
Almost any issue you run into has likely been experienced by countless others, and a simple Google search can often get you on your way to finding the right answer for common WordPress publishing frustrations. If all else fails, you can always rely on WordPress support & maintenance or contact SiteCare from SiteCare to take care of technical challenges, updates, and publishing tasks so you can focus on creating great content.


