Want to learn some quick and simple WordPress tips and tricks to help your every day publishing productivity? You’ve come to the right place! The time demands of a creative person online stretch well beyond the conventional nine-to-five. Reading through (and applying) these tips is a great way to give that tired brain a hug.
I guarantee that even seasoned bloggers will find at least one tip or trick in this list that they didn’t know before. Some of these tricks have been passed down for generat… ok, that’s a stretch. But the point is, this is a really solid tips and tricks list to make WordPress bend the way you need it to, and to save you time every single day.
Let’s get to the list, shall we?
Table of Contents
- Dashboard screen options
- Quick bulk editing
- Embed Blocks for auto-embeds
- Image compression
- Default image dimensions
- Streamlined SEO titles/metas
- Rewrite & Republish tool
- Hiding the WordPress toolbar
- Proper use of categories and tags
- Establishing redirects
- WordPress keyboard shortcuts
- Block Editor list view
- Assigning appropriate user roles
- Timezones and time/date formatting
1. Customizing your dashboard screen options
Ever feel overwhelmed by the sheer amount of information displayed when perusing the list of Pages or Posts in your WordPress dashboard? Or simply frustrated with how messy it is? Maybe you have so many columns enabled that the table is starting to look something like this:
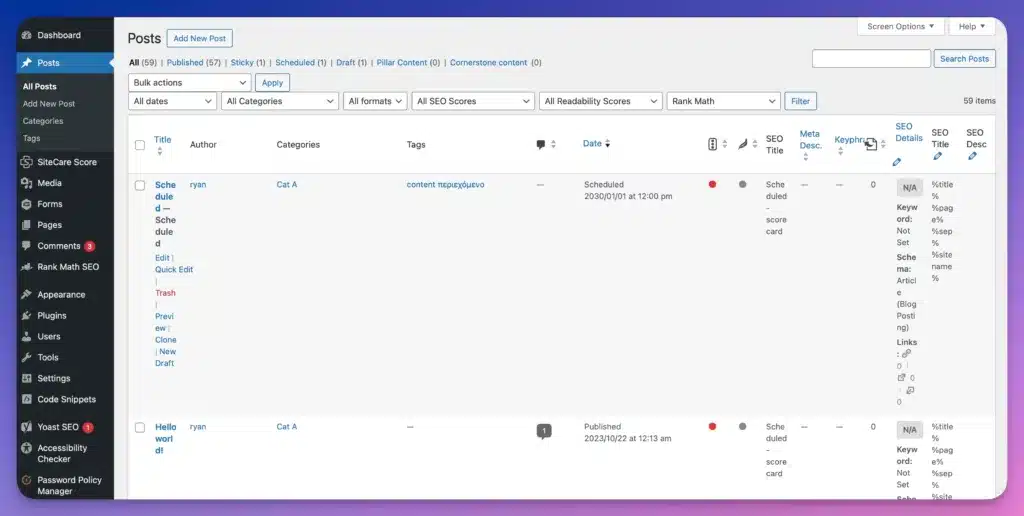
Not only is this confusing, but it makes it incredibly challenging and cumbersome to accomplish basic tasks. Fortunately, this confusion is easily remedied thanks to WordPress Screen Options:
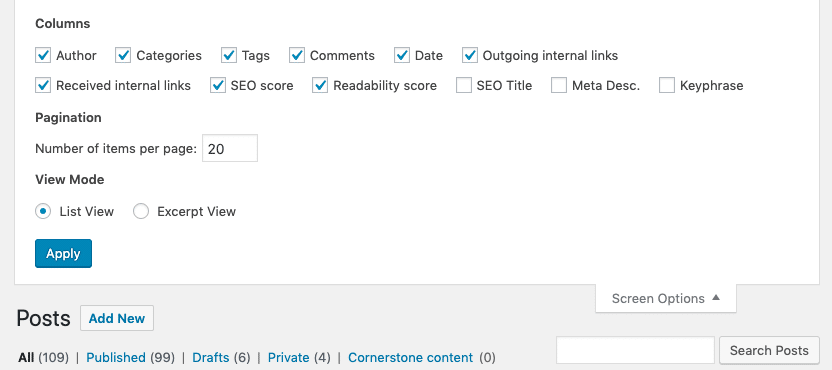
This tool, which appears on nearly every page on your dashboard in the top right corner, allows you to choose exactly what information you want to see. For example, if you wanted a very minimal Posts dashboard, you might uncheck all columns so that you only see Post titles and Dates:
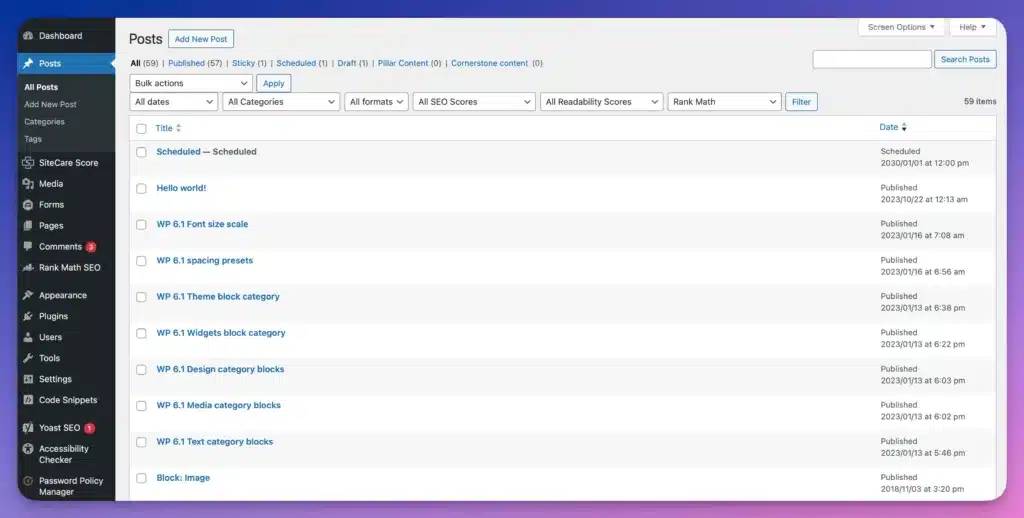
Another great thing about screen options is that they are unique to every user. This means that when you customize WordPress screen options, it only affects your user account, which means you don’t have to worry about messing up another user’s preferred dashboard settings.
Want to learn more about how to make the most of screen options? Check out our post, “Create a Zen Workspace Using Screen Options in WordPress,” for the full picture.
2. Quick bulk editing directly from your dashboard
Need to change the author of multiple blog posts, add the same category or tag to multiple posts, or unpublish a lot of content all at once?
You could go through every single blog post and change these things manually, but depending on how many pages or posts you need to adjust, this could take ages. Luckily, the WordPress dashboard has a Bulk Actions tool that makes it easy to make sweeping changes to your pages and posts in no time.
Using this bulk editing tool is super easy. Here’s a brief video demonstration of how it works:
- Select the items you want to edit in bulk
- Click on the dropdown menu at the top of the page called “Bulk Actions”
- Select “Edit” to change details like author, categories, tags, publishing status, and more.
- Click on “Update” to apply your changes.
In addition to bulk editing, you can also use the Bulk Actions tool to delete (“Move to Trash”) or duplicate (“Clone”) multiple items. Pretty slick!
3. Taking advantage of media blocks for automatic embedding
Embed Blocks are a great way to bring rich media from other sources into your content. It helps make content more engaging, interesting, and allows writers to curate instead of painstaking scrawling out every single word for the audience.
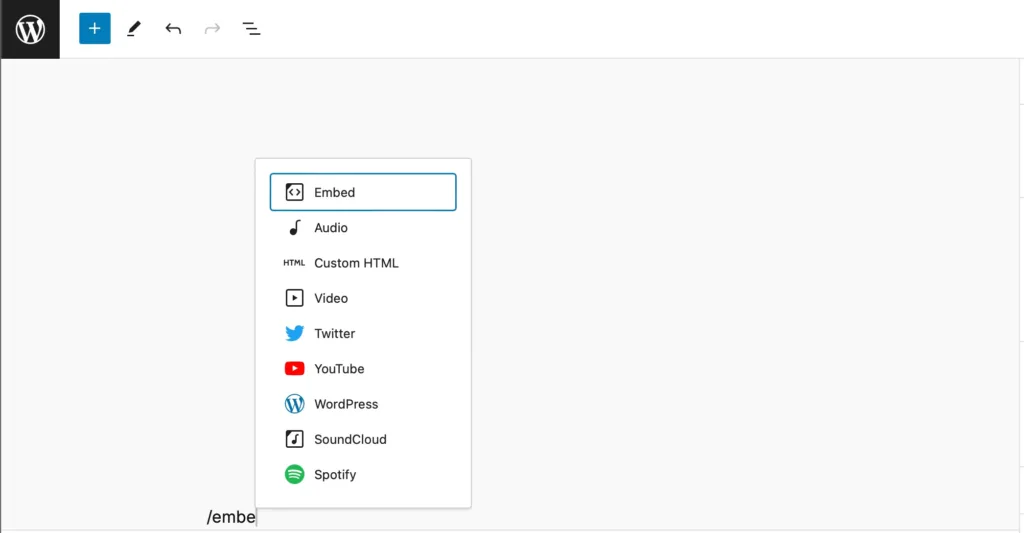
Type /embed in to the post editor to see a full list of options. Choose the block for the appropriate service, paste in the URL, and you have rich media displaying in your article.
But now let’s take embed blocks to another level. What if I told said that the embed block isn’t even necessary? Technically speaking the block is still there lurking behind the scenes, but editors can save a step by pasting the URL right into the post editor without adding a block first! try and take a URL from one of the supported services and paste it directly into the post editor without a block at all.
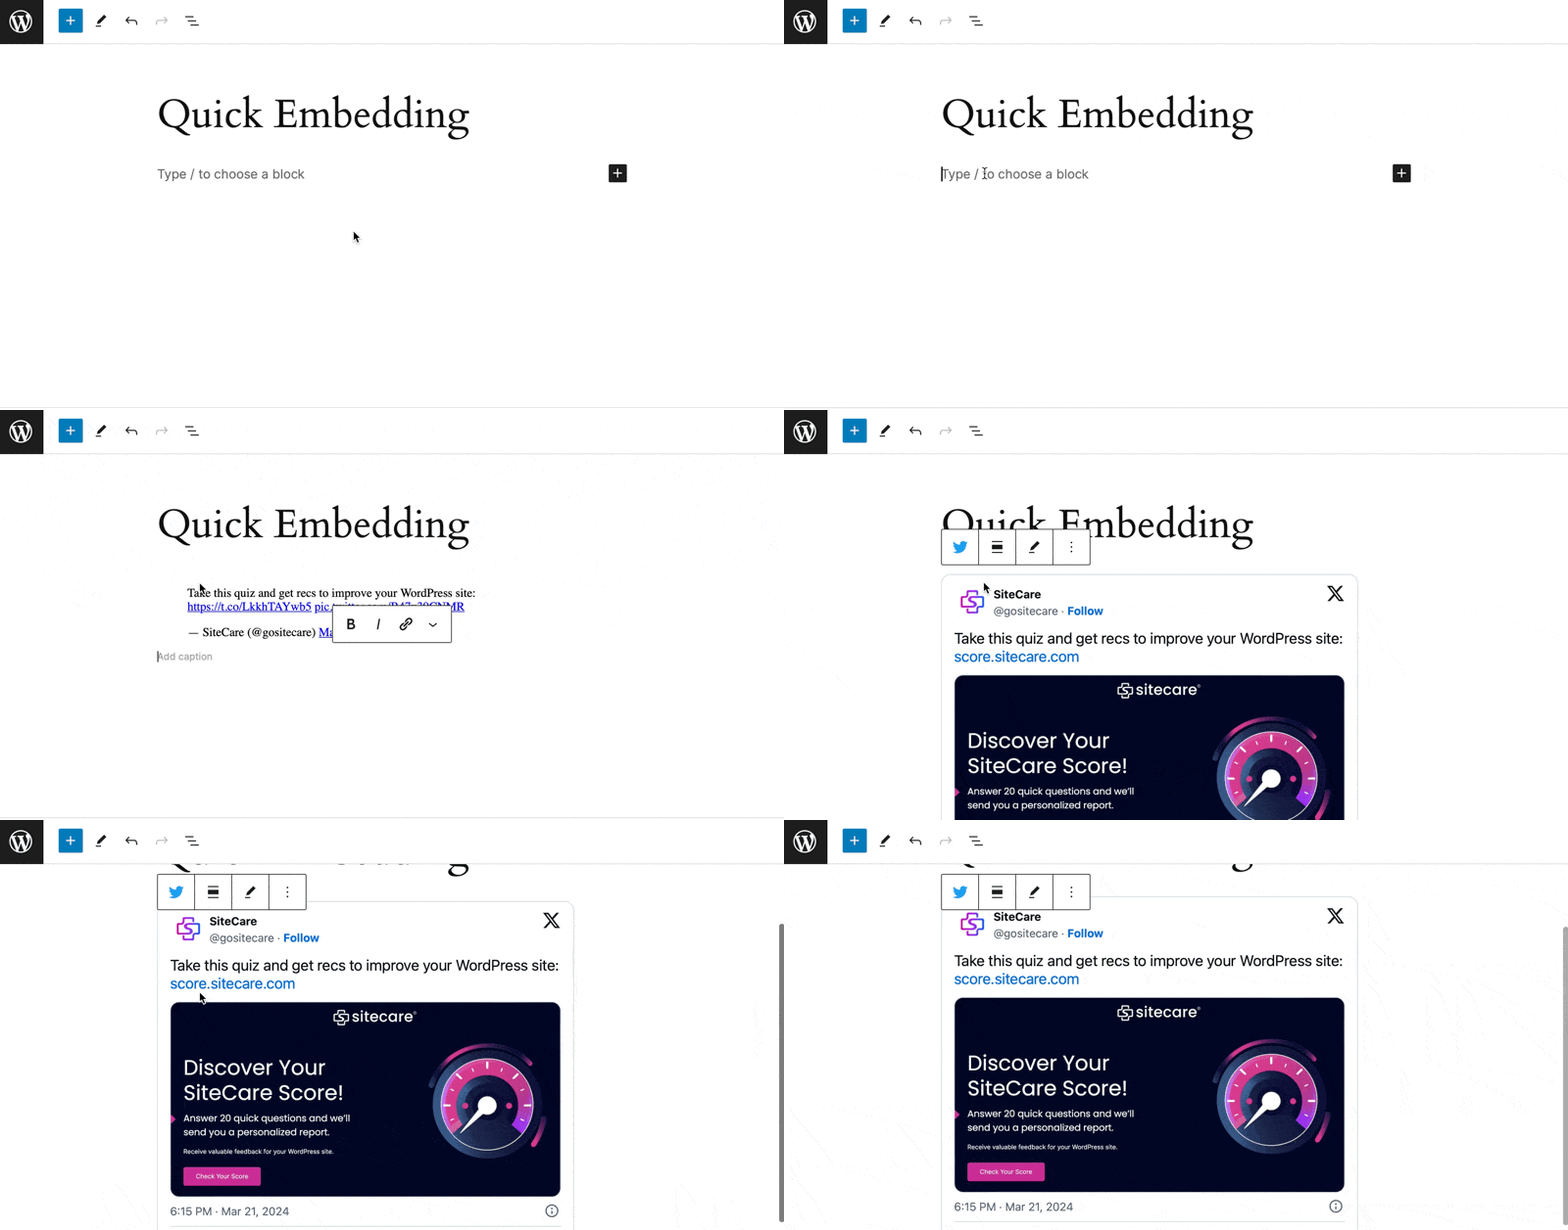
I use this feature every single day and it never ceases to feel like magic. Currently, WordPress supports auto-embed functionality from 34 different services, including video sites like YouTube, Vimeo, Animoto, and TED, as well as popular social media platforms like Facebook, Twitter, TikTok, Instagram, and Reddit. Business bloggers will like embedding from Speaker Deck, Slideshare, Scribd, and Pocket Casts.
4. Installing an automatic image compression plugin

We all love big, beautiful imagery, but if you haven’t properly optimized images on your site, it won’t matter how astounding the images are. The vast majority of users will abandon your site if it takes longer than 3 seconds to load, and huge image files are often to blame.
Of course, no one wants to spend their precious time resizing large image files before uploading, which is why we strongly recommend installing an image compression plugin that will automatically take care of the work for you.
The image compression plugin we use and recommend to our clients is Imagify, which does a fantastic job of compressing image file sizes without sacrificing quality.
Imagify is great because it takes care of resizing images and compressing them at the same time. For example, as a website admin I can say that I don’t want any images with a width larger than 2000px uploaded to my media library. That’s relevant because a standard iPhone image is even larger than that now. So if someone uploads a 5000px image, Imagify will resize and compress the image before it’s even available in your library.
5. Adjusting default image dimensions to best suit your site
We’ve talked about the importance of installing an image compression plugin to reduce image file weight, but your image optimization efforts shouldn’t stop there.
Another important action to optimize your site’s images is making sure the settings for default image dimensions best suit your design and content. This is controlled through a little-known page in your dashboard called Media Settings (located under Settings > Media).
These options have been around since the early days of WordPress, and I can’t tell you how often most people never even look at them.
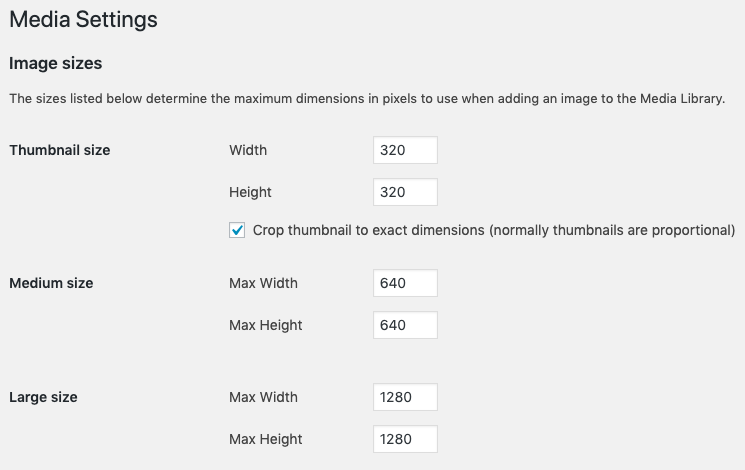
Why is it a good idea to review your Media Settings? Well, whenever you upload an image, WordPress automatically creates multiple versions of it in different sizes — Thumbnail, Medium, and Large. But sometimes that “Large” version may be much larger than necessary. After all, it doesn’t make sense to have a “Large” image size of 2000px if your max-content width is ~800px.
Fine-tuning your Media Settings ensures that any images you upload are appropriately sized to fit within the design of your site. Plus, cutting down on those 2000px-sized images also helps you save server space!
6. Simplifying SEO titles and meta descriptions
If you don’t have the Yoast plugin already, you’re seriously missing out. Yoast is not only the most popular SEO plugin for WordPress. It’s one of the most popular WordPress plugins, period! One of the features that helped establish this reputation is its search engine snippet preview editor, which makes it super simple to add SEO titles and meta descriptions as you publish new content.
When installed, the Yoast SEO box will appear underneath the body text editor on your pages, posts, and other content types. It will look something like this:
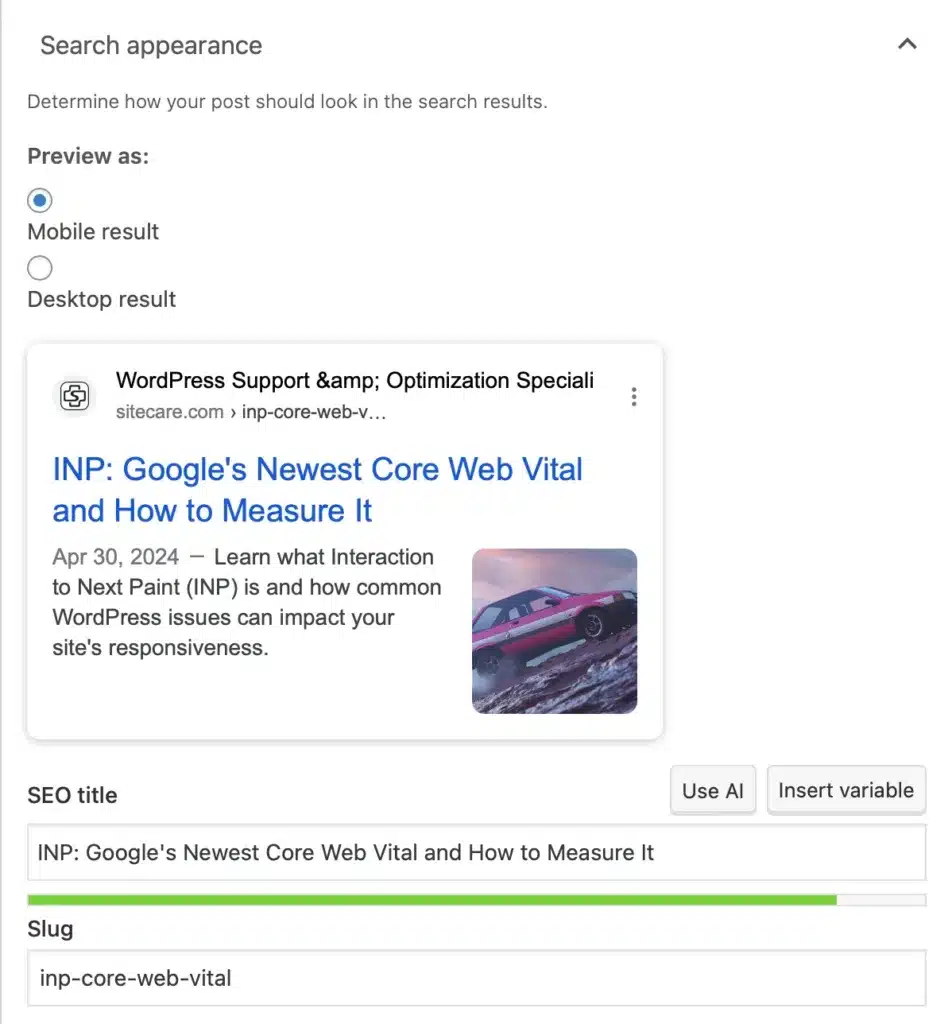
The plugin guides you on the appropriate length of your title and meta description, and it also allows you to insert snippet variables to speed up the process further. The snippet preview at the top shows you what the particular page or post will look like in search engine results, which can be extremely useful. You can make sure the most important information is shown in the view that the rest of the world is seeing.
In addition to coaching you on how to create a solid SEO title and meta description, Yoast provides additional controls and analysis tools to ensure you’re putting your best foot forward in the SEO arena.
7. Using the Rewrite and Republish Tool from Yoast Duplicate Post
The Yoast Duplicate Post is a content cloning tool. It’s quick and easy to make an exact copy of any piece of content on your website. But why would anyone want to duplicate their content? Doesn’t that put website’s at risk of a duplicate content penalty?
Think of cloning content like using a template in Google Docs. The intention isn’t to have multiple pieces of the same content on your website. The clone tool carries over the most important attributes of every post from one piece of content to the next, which is a fantastic time saver.
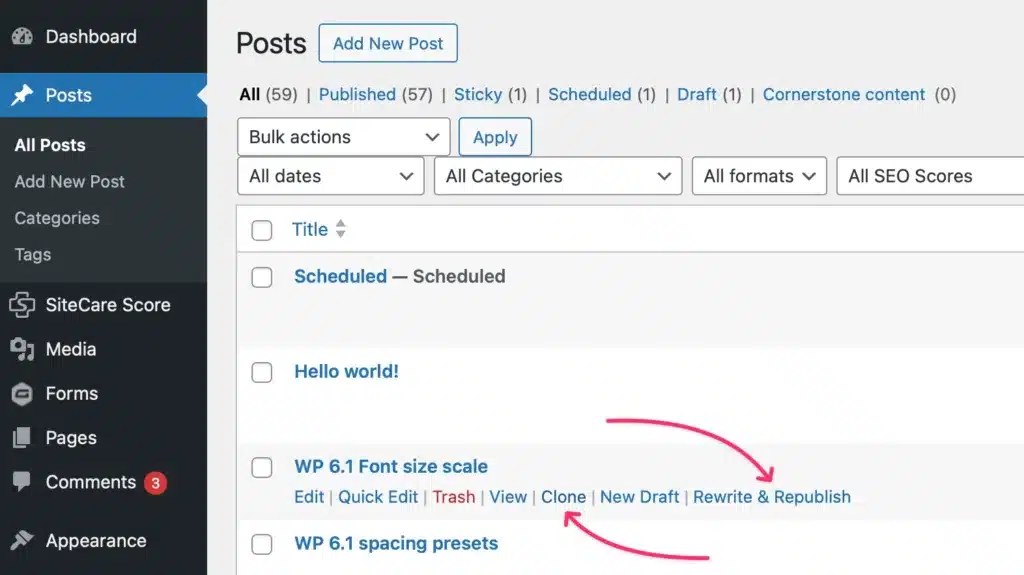
But I rarely see people talking about the true hidden gem of Yoast Duplicate Post, and that’s the Rewrite & Republish tool. You see, WordPress doesn’t natively have a way to safely rewrite an existing piece of content. Out of the box rewriting a page or post requires editing live content, which is nerve wracking. No one wants to feel like hitting saving too early, or removing the wrong section of a page is going to result in a broken experience for the website visitors.
Rewrite & Republish creates a temporary draft copy of the page to edit. Make all of the edits that busy little heart desires, and then Republish the content. The plugin takes the temporary draft, and completely replaces the original piece of content, preserving the page URL and everything. It’s a feature that belongs in WordPress core!
8. Hiding the WordPress toolbar
While the trusty WordPress toolbar you see at the top of a page while logged in can serve as a useful anchor for editing site content, there are times you might want to get rid of it. Perhaps it partially blocks a top navigational menu item, or maybe you don’t want to have to log out of WordPress just to view your site without the toolbar.
The controls for hiding and unhiding the WordPress toolbar can be found in the Dashboard under Users > Your Profile.

It’s important to note that checking that box will only affect your user account. If your site has other user accounts, their toolbar will remain unless they take the same steps.
9. Using categories and tags properly

If you’re serious about your WordPress site’s SEO and information architecture, then you need to be serious about taxonomy. What is taxonomy? It’s simply the way things are logically grouped together. If you have a WordPress site, the taxonomy of your blog posts is largely dictated by a system of categories and tags.
There is often a lot of confusion surrounding how to use categories and tags, but the basic concept is this:
- Categories are primary, high-level topics of your site. Most posts should clearly fit within a single category.
- Tags are used for logical groupings that apply across multiple categories.
Generally, a post will have a single category and one or more tags. Need a little more schooling on this subject? Don’t miss our guide on how to use WordPress categories and tags.
10. Establishing redirects after changing or deleting URLs
If you change or delete a URL on your site, it’s important to implement a redirect from that former URL to a new page. If you don’t take this step, users and search engine bots trying to access a URL that no longer exists will be presented with a 404 error. Not only is a 404 error a bad user experience for people visiting your site, but it can ding you in your search engine rankings. Redirecting that old URL to a new one solves this problem.
So, how do you set up a redirect? It’s actually pretty simple! Your first step is to install the Redirection plugin. Once you’ve installed the plugin, you can access it in the WordPress dashboard under Tools > Redirection. To establish a new redirect, click on “Add New” at the top of the page and the following form will pop up:

All you need to do is add the URL being changed or deleted into the “Source URL” field, and then add the URL you want to redirect to in the “Target URL” field. Then click “Add Redirect” and you’re done!
11. Familiarizing yourself with WordPress keyboard shortcuts

Keyboard shortcuts are invaluable if you spend a lot of time creating, editing, or managing content in a WordPress site. How many of you fly through your gmail inbox using shortcuts without even knowing it? Did you even know that WordPress had it’s own set of shortcuts?
While many keyboard shortcuts are fairly universal (such as ctrl/command+C to copy and ctrl/command+P to paste), there are many WordPress-specific keyboard shortcuts that allow you to speed up content formatting in the visual editor or streamline comment moderation.
How about Alt + Shift + Q to automatically drop a Quote block into an article? Or leading a section title with ## to designate an H2 heading?
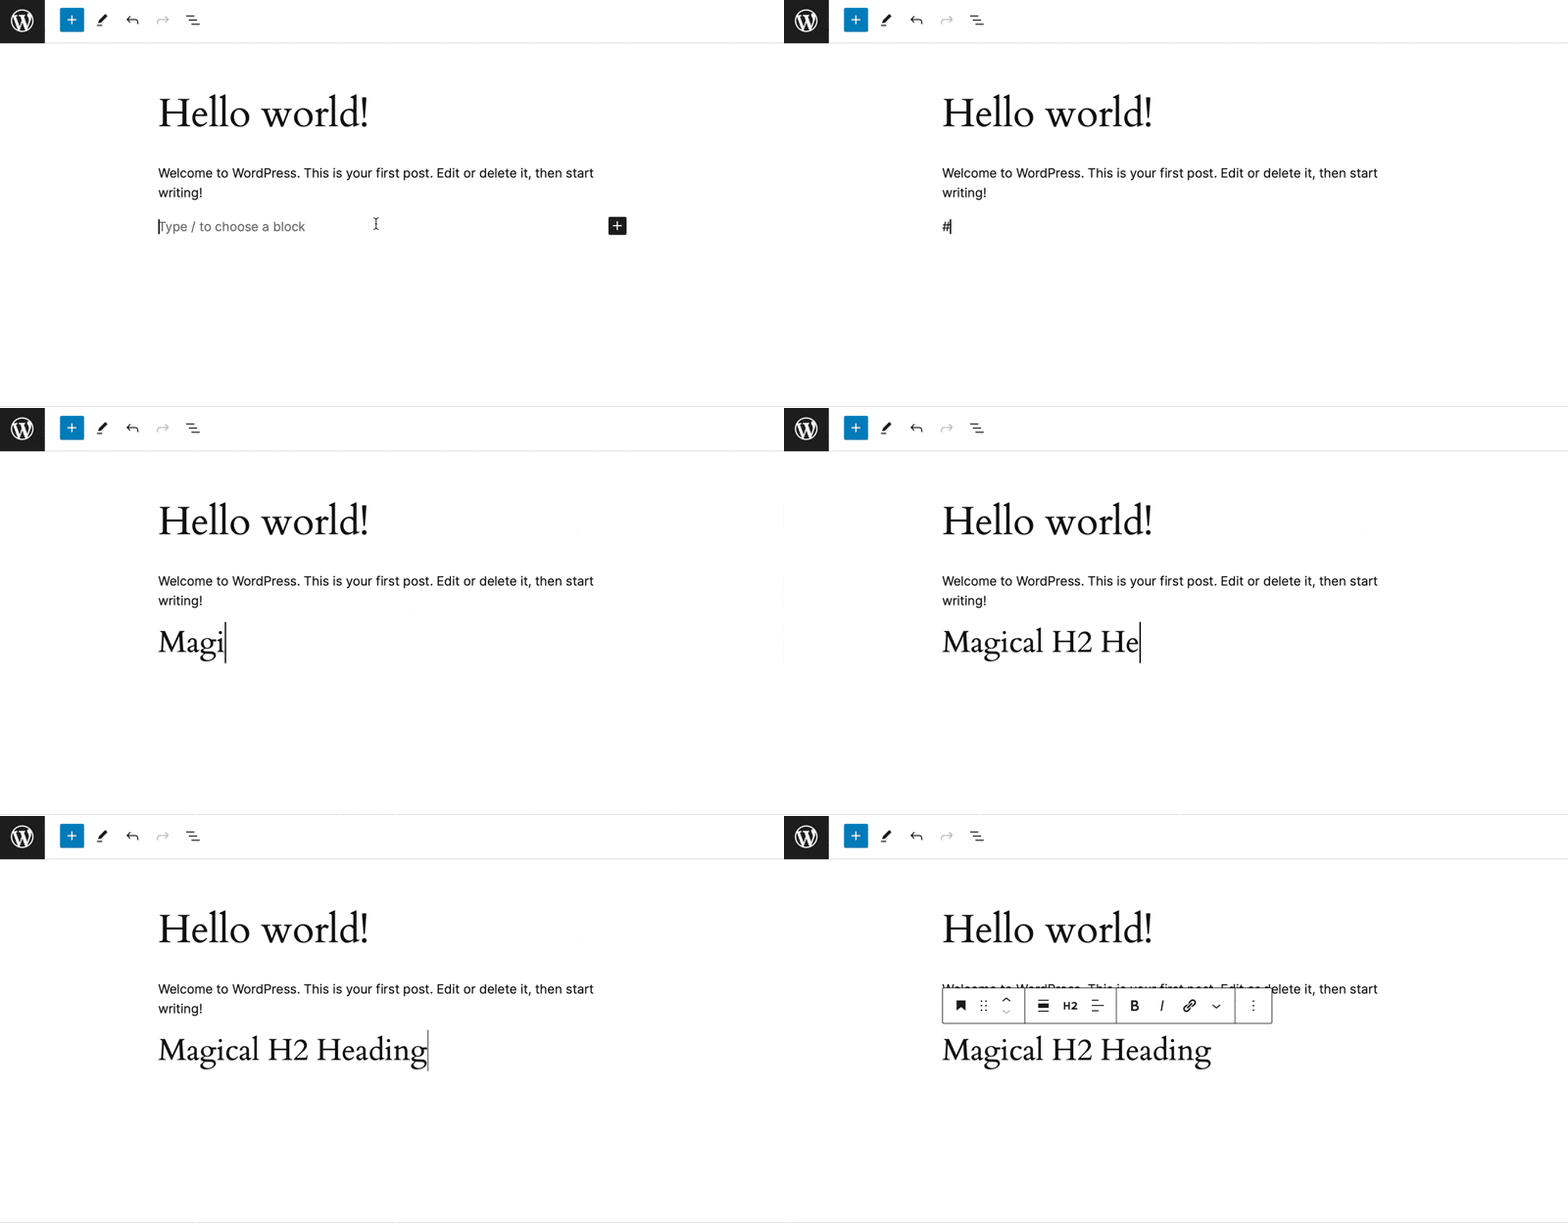
Keyboard shortcuts will vary based on whether you’re using Windows/Linux or a Mac. WordPress.org provides a full list of WordPress keyboard shortcuts and how to use them based on your operating system.
12. Using the List View in the Block Editor for easier content arrangement
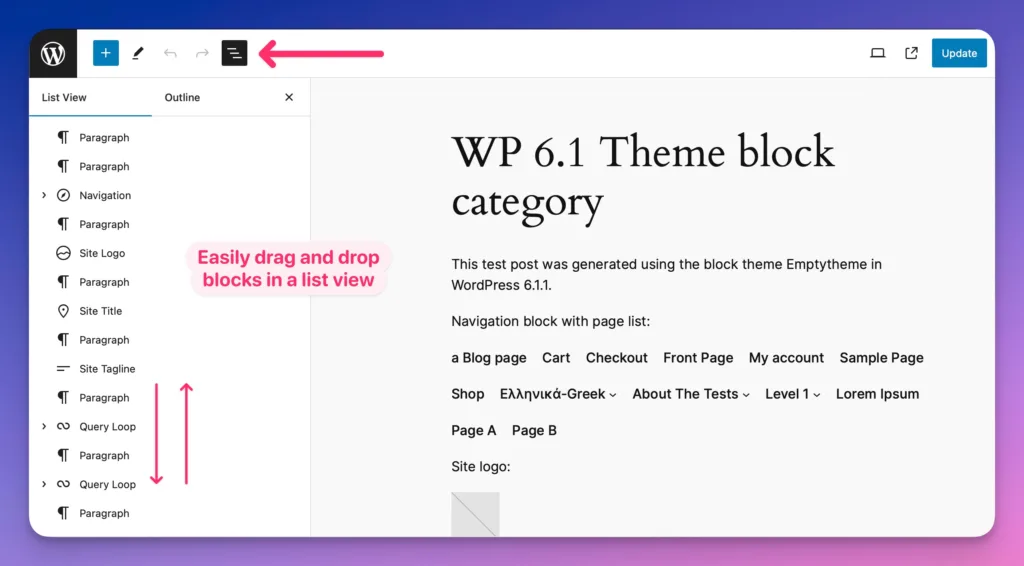
Moving blocks around in the Block Editor isn’t always the most intuitive and it’s extremely common to start dragging a block and have it land a far cry from the original destination.
The Block Editor list view is the saving grace for people like me lack the surgical precision required to drop a stack block inside of a four-column layout. If that reference didn’t make sense, head over and read our top tips and tricks for using the block editor.
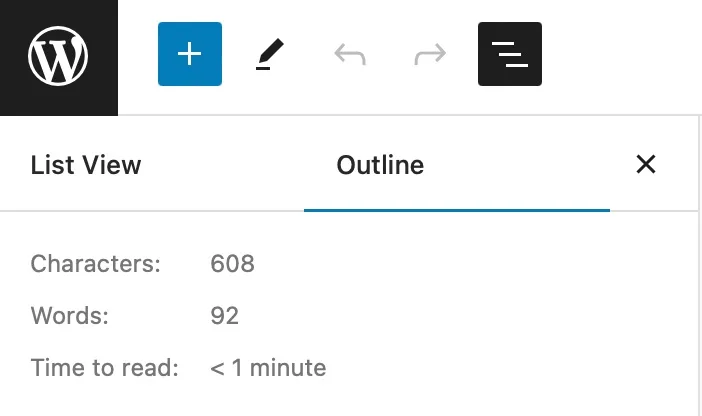
Click “Outline” in the list view and get a birds eye view of the overall document structure. This is a quick and easy way to spot if there are too many headings in an article, if headings aren’t spaced properly, or to get a quick word count and reading time.
13. Assigning appropriate WordPress user roles
If everyone on your team has an Administrator user role on your WordPress site, you could be setting yourself up for heartache should one of those accounts totally wreck your site. We’ve seen it happen, folks! Site hacks caused by bad password habits and phishing scams are the most common culprits, though sometimes it turns out to be an accidental inside job by “over-permissioned” users who were poking at plugins, themes, or other site settings without knowing what they were doing.
Luckily, it’s super easy to prevent these sticky situations, though — just assign appropriate roles and permissions for each user account you create!
WordPress comes standard with five user roles, each with varying degrees of permissions and abilities. Trying to figure out which roles are best suited for people on your team? Here’s a breakdown of the permissions of each role:
- Administrators have full control of every aspect of a WordPress site. They can alter site settings, change themes, add or remove plugins, create new users, and so much more. This role is typically reserved for the site owner(s) and/or developers.
- Editors have full control over the management of your site’s content areas, but they may not alter site settings, plugins, themes, or add new users.
- Authors may write, edit, publish, and delete their own posts, but not anyone else’s.
- Contributors may write and edit their own posts, but cannot publish posts or upload new images to the site.
- Subscribers may only login to their account, edit their profile, and change their passwords. This role is most often used in situations in which you want a user to login before viewing a post of adding a comment to a post.
14. Setting the timezone and time/date formatting on your site
If you’re scheduling content to publish on your WordPress site, then setting the correct time zone is critical. Otherwise, you might schedule a post to publish at 9:00 AM only to see it published several hours off, depending on where your time zone is set. To access timezone settings, navigate to Settings > General, and find this section:

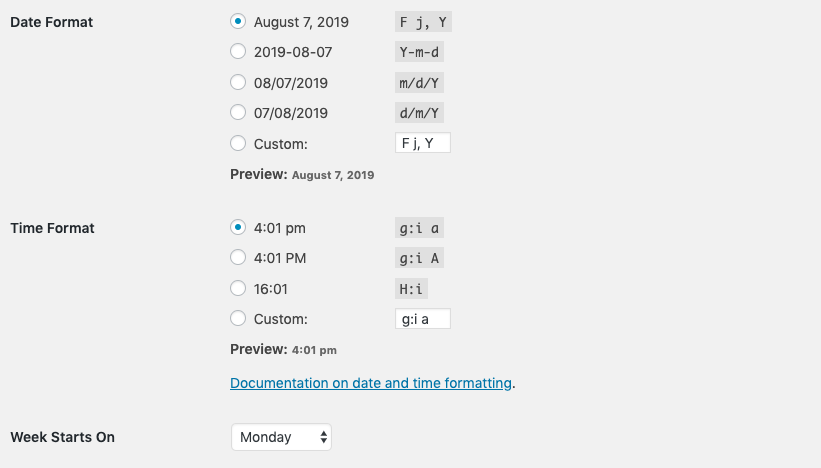
Just below the timezone section, you’ll see an additional section for date and time formatting. Want the date to appear like “YYYY/MM/DD” instead of spelling it out? Prefer to use military time over AM/PM time? This is where you control those preferences:
That’s all folks … for now!
There are so many ways to make use of the WordPress tips and tricks to maximize and streamline your daily productivity. Because time is the one thing we can’t make more of. Did we miss one tip or trick that should definitely be on the list? Let us know in the comments!


7 responses to “14 WordPress Tips & Tricks Every Blogger Needs to Know”
Thanks for your great post. I have learned a lot from it. I have a suggestion: why don’t you add some tips about WordPress site security?
i am a new blogger this article really helpful for me. this wordpress tips are really useful. article is nicely explained and easy to understand. thanks for sharing this valuable information with us. keep your good work.
I’m new to blogging and those tips are very helpful for me as a begginer. I want to thank you for the great content.
Some of them are highly useful, thank you! Solid content
I did not know you could bulk edit from your wordpress dashbord. Thanks for this time saving tip.
Hello,
I am missing my old editor after updating my WordPress version. Before WordPress 5 all things were going smoothly. WordPress 5 & higher editor sucks.
Can you tell me how to use the old editor in WordPress 5+ versions?
Your tips make a lot of things easier for me, so I will definitely start doing some of these tips. Thank you so much for sharing this wonderful content with us.