While using WordPress is relatively easy, and the software is thoroughly tried and tested, errors do occasionally pop up. These errors can range from frustrating to detrimental, depending on the complexity of the problem as well as the consequences of your website being down. Downtime can be costly and should be kept to a minimum.
This blog looks at the most common errors that can crop up from time to time on your WordPress site, and what you can do about them.
Table of Contents
- What is a WordPress error?
- What is a Fatal Error in WordPress?
- 7 common WordPress errors
- How to make your life easier
What is a WordPress error?
While the causes differ, the results are often similar. When experiencing an error, your website will not load. Instead, it will display an error message or simply a blank, white screen. As of WordPress 5.2, WordPress has a built-in Recovery Mode to help with resolving errors and troubleshooting possible issues on your website. Resolving these errors might seem intimidating at first, but there’s no need to panic. Most of them are caused by relatively small issues that other users have experienced before and are easy to fix.
What is a fatal error in WordPress?
Now and then, the pop-up message will announce a fatal error. This looks very serious because it might seem like the entire site is taken down. Still, you can easily fix this. A fatal error often occurs after installing or updating a plugin or theme or when adding new code.
If you encounter a fatal error, the safest course of action is to get expert technical support. An expert can help you return your website to normal functionality quickly with less risk of losing your content or prolonged downtime.
SiteCare’s professional team of expert WordPress developers helps you get your website up and running in no time. Do get in touch for assistance if and when needed.
7 common WordPress errors
Now, let’s look at what the most common WordPress errors are.
We chose the following seven errors based on how often users encounter them and how easy they are to fix using a quick how-to guide. Note, to implement these fixes, you will need to know how to change file permissions.
1. Internal server error
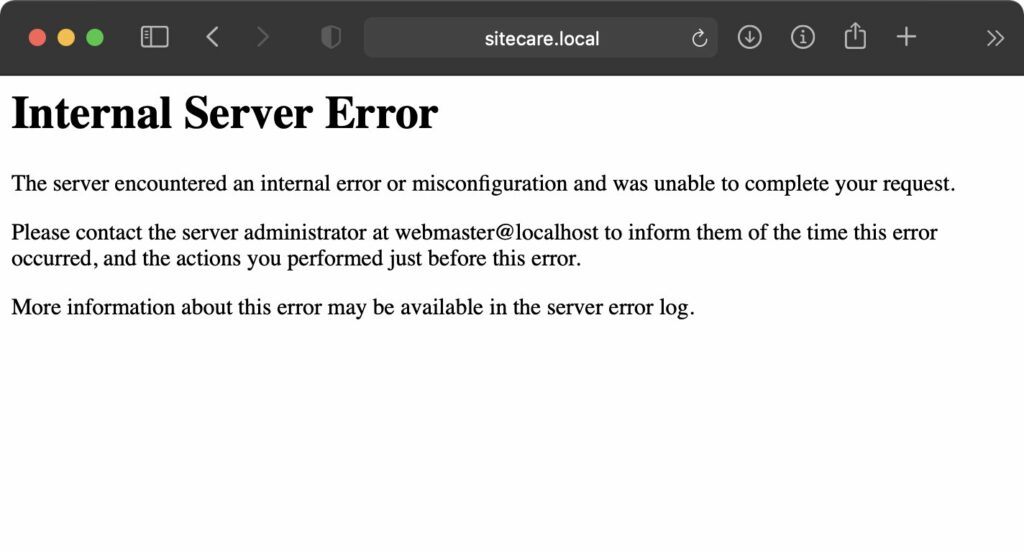
What is an internal server error?
This error indicates that there is something wrong, but the server can’t identify the underlying problem. Internal server errors are typically caused by one of two issues: The memory limit of the site has been reached, or there is a problem with the site’s .htaccess (or hypertext access) file. This file can be found on a web server and controls the high-level configuration of a website.
How to fix an internal server error
Step 1: Disable the .htaccess file by simply renaming the file (e.g., .htaccess_test). Reload the site to see if the site loads. If it does, go to ‘Settings’ to reset your Permalinks, which will generate a new .htaccess file with the default WordPress htaccess rules. Note: Any customizations to your original .htaccess file will need to be added back or modified to work properly.
Here are the default WordPress .htaccess files if you need them in a pinch:
# BEGIN WordPress
<IfModule mod_rewrite.c>
RewriteEngine On
RewriteBase /
RewriteRule ^index\.php$ - [L]
RewriteCond %{REQUEST_FILENAME} !-f
RewriteCond %{REQUEST_FILENAME} !-d
RewriteRule . /index.php [L]
</IfModule>
# END WordPress
Step 2: Deactivate your plugins to see if any of these are causing the problem. If you’re unable to access your WordPress dashboard, you can deactivate your plugins by renaming your plugins folder the same way you renamed your .htaccess file (e.g. /plugins-test/).
Step 3: If the actions above don’t work, one last thing to try would be to try increasing your PHP memory limit. Typically PHP limits will give a more specific error like “Allowed memory size of 84892898 bytes exhausted”, but it’s possible that a generic Internal Server Error is generated too.
As long as it’s allowed by your host, you can increase the PHP Memory limit for WordPress by adding the following to your wp-config.php file. This file is located in your website’s root directory.
define( 'WP_MEMORY_LIMIT', '256M' );Modify the 256M to change the amount of memory allocated for WordPress.
2. Error establishing a database connection
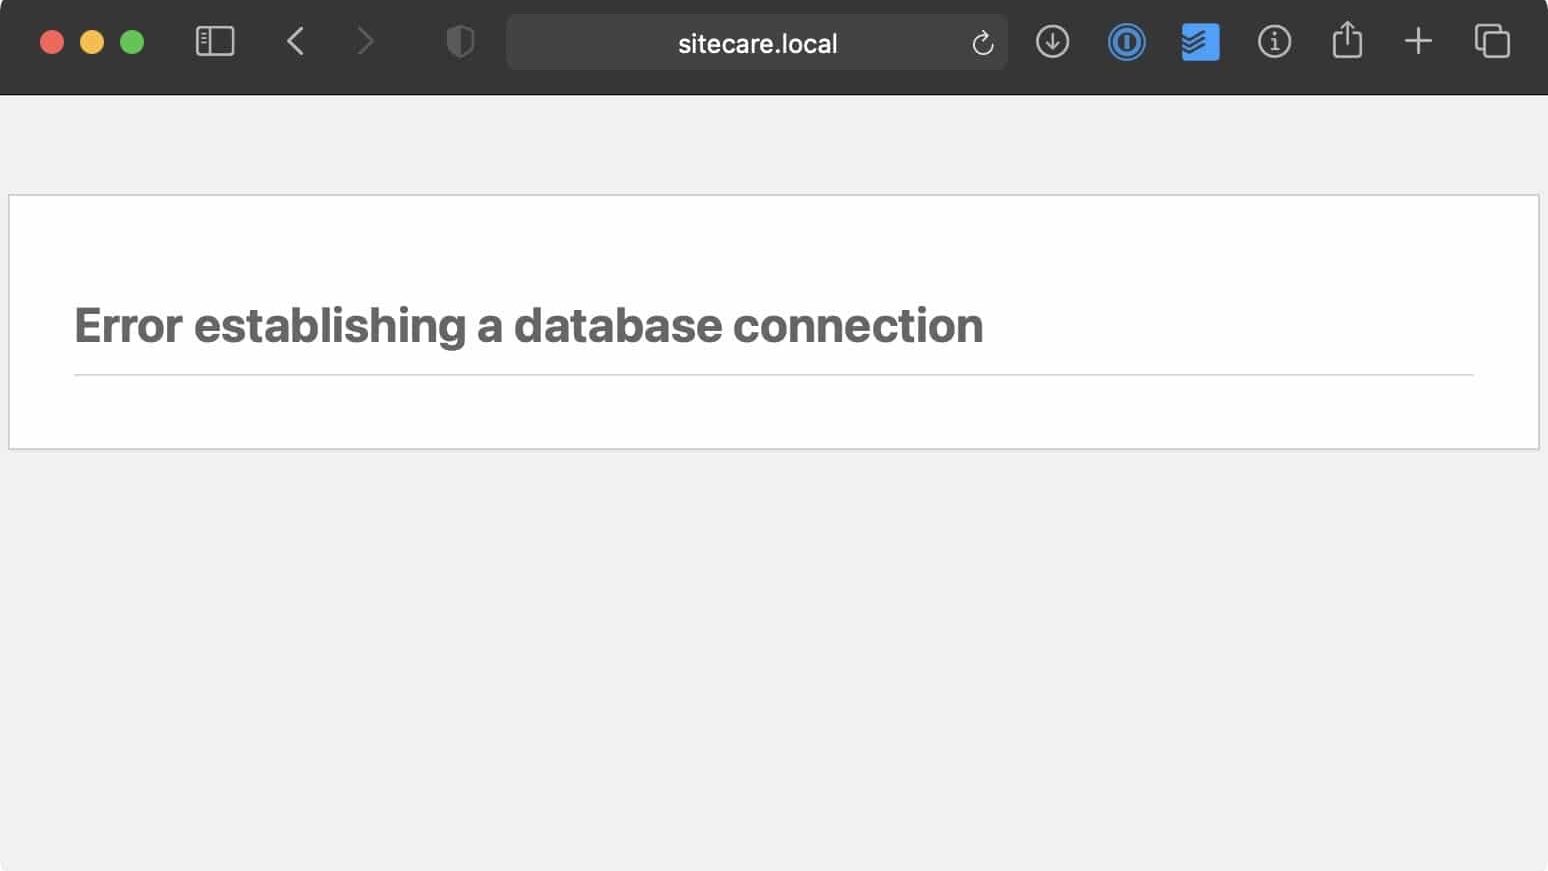
What is a database connection error?
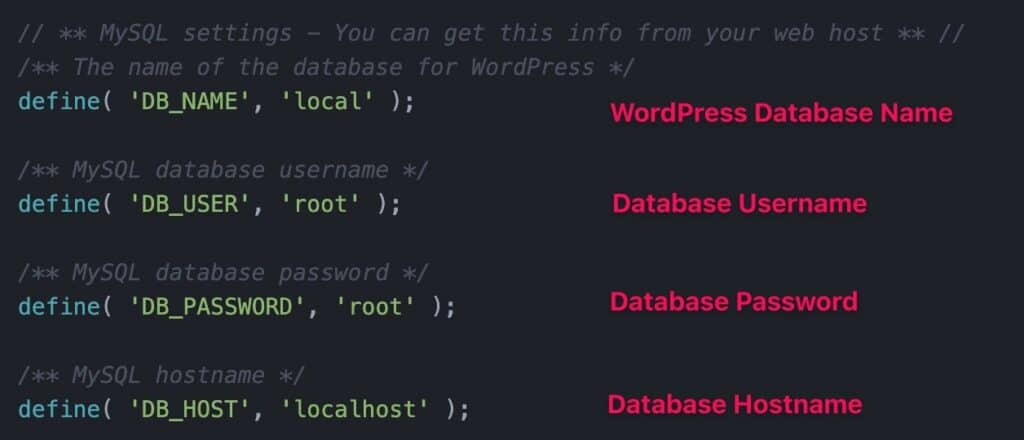
This error happens when the site can’t access the database. The source of this error often lies with the wp-config.php file, which contains the database information of the site.
How to fix a database connection error
Step 1: Make sure the credentials in the wp-config.php file are correct. To do this, go to the root folder, right-click on the file, and select ‘View/Edit.’ Compare the username, password, hostname, etc., to the details found in phpMyAdmin and update, if necessary.
Step 2: If the error is still not solved, you can activate the WordPress Automatic Database Optimization tool. To do this, add the following line to your wp-config.php file: define( 'WP_ALLOW_REPAIR', true ); and then go to https://yourwebsiteurl.com/wp-admin/maint/repair.php.
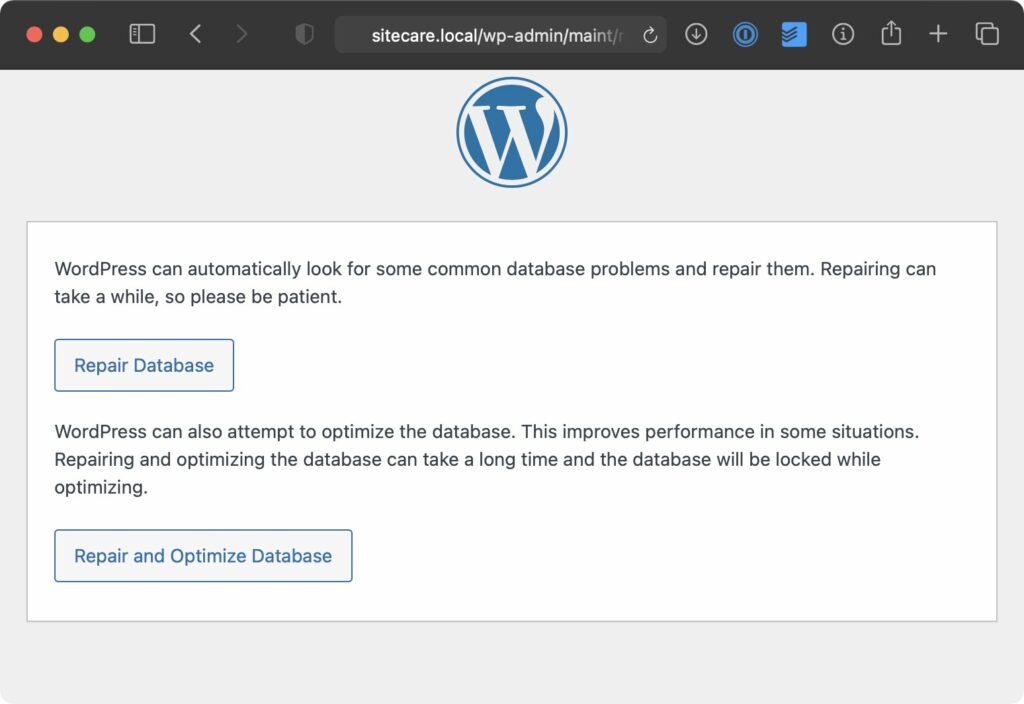
Click on the ‘Repair Database’ or “Repair and Optimize Database” button. Once done, remove the added line of code from your wp-config.php file.
Step 3: If the problem persists, contact your web hosting provider in case of an outage or data loss.
3. White Screen of Death
What is the White Screen of Death?
Your site is replaced with a blank, white screen. There is nothing. Your site isn’t loading properly, and there is no error message to assist. This could be either a PHP or database error, but where do you start looking to find out what’s wrong?
How to fix a White Screen of Death
Step 1: Disable all your plugins and see if this resolves the issue. Reactivate the plugins one by one to determine which one is causing the problem. If this doesn’t resolve the issue, proceed to the step below.
Tip: If you’re unable to access your WordPress dashboard directly, you can enter WordPress recovery mode which will allow you to change plugin and theme settings. If you didn’t receive the recovery mode email with a link to the recovery mode area, you can simply add /wp-login.php?action=entered_recovery_mode to the end of your website URL to access recovery mode directly.
When a fatal error occurs, a user-facing error screen will display that informs the user/visitor that the site is experiencing technical difficulties. More importantly though, when such an error occurs, an email will be sent to the admin email address, informing about the issue and including a secret link to new feature called the “recovery mode”. Clicking this link will have the user enter this recovery mode, which works by placing a cookie on the current client.
FeLIX ARNTZ – WordPress Core Contributor
Step 2: A newly installed theme could cause the problem. Disable your theme to see if this is the case. Again, if you can’t access your WordPress dashboard through the standard /wp-admin/ or /wp-login.php paths, the recovery mode link will serve you well.
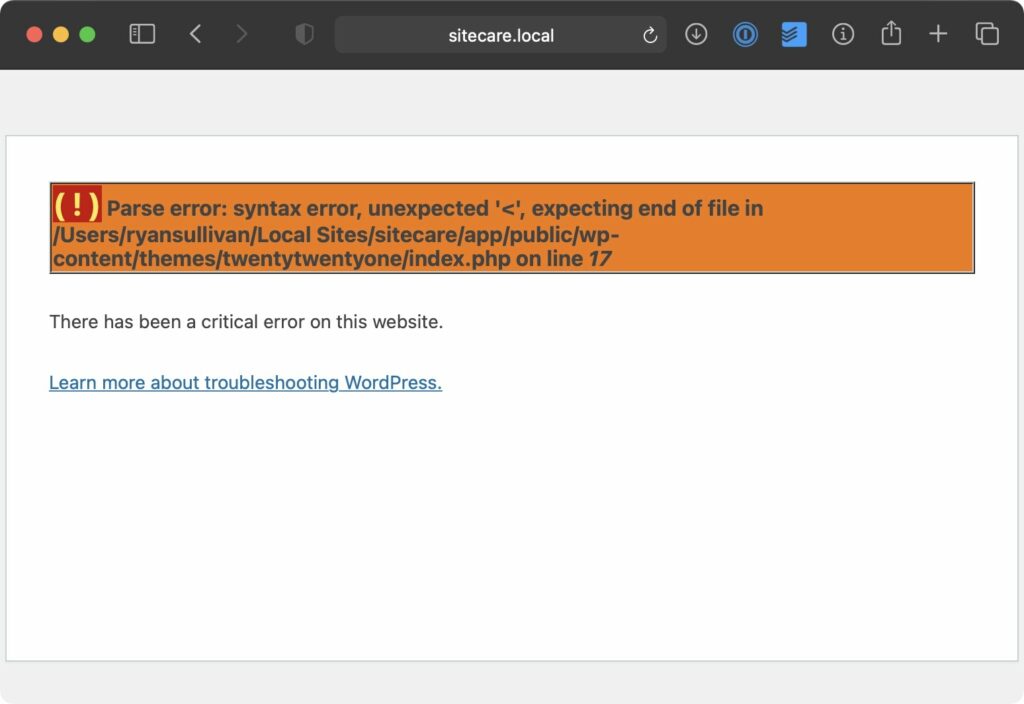
Step 3: Use the WordPress debug mode feature to identify the problem. This is an advanced troubleshooting technique that will give you a code level view of the exact error that WordPress is encountering. If you get to this point and aren’t comfortable editing files on your server, reach out to WordPress experts for assistance.
You can enable debug mode on your site by adding the following to your wp-config.php file.
define( 'WP_DEBUG', true );
define( 'WP_DEBUG_LOG', false );
define( 'WP_DEBUG_DISPLAY', false );
Here’s an example of what your error reports might look like:
For even more troubleshooting techniques and possible resolutions check out our in-depth guide for recovering from a white screen of death.
4. 404 Error
What is a 404 error?
A 404 error appears when visiting a single post or page, saying the page can’t be found. You can, however, still browse other sections of the website. Broken links are often the cause, and WordPress users typically experience this when using custom permalinks (i.e., SEO and user-friendly URLs).
How to fix a 404 error
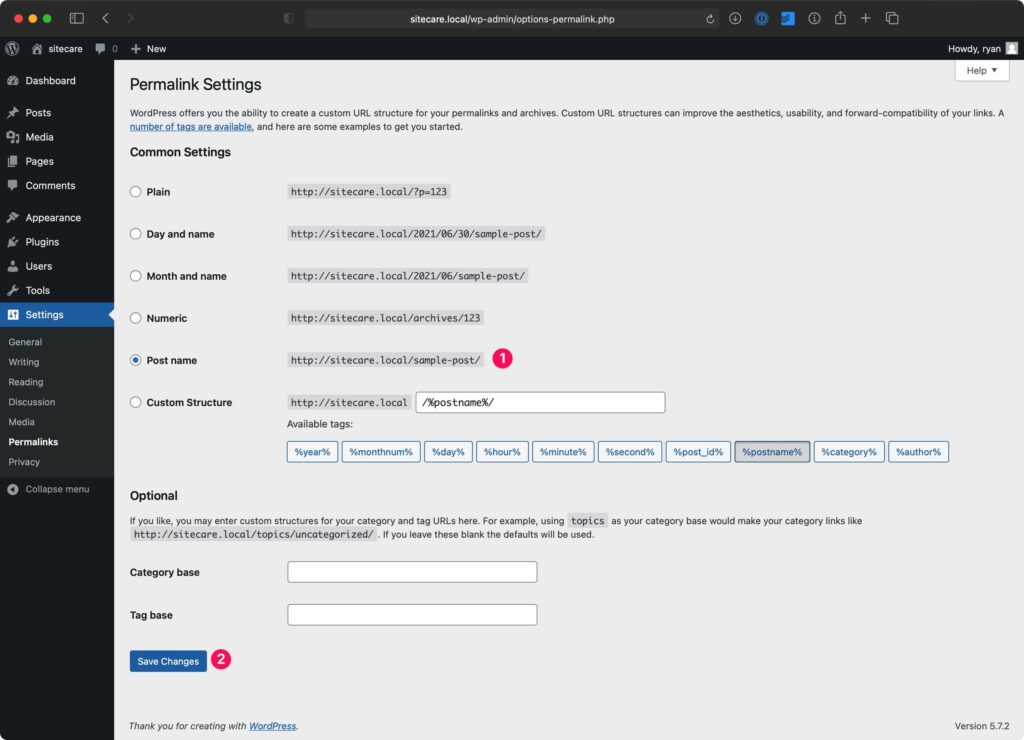
Step 1: Refresh your permalinks settings. To do this, go to ‘Settings,’ select ‘Permalinks,’ and hit the ‘Save Changes’ button. It’s very important that you do not change your permalink settings. Simply save the options as they are, which will update the rewrite rules on the server.
Step 2: Manually update the .htaccess file to the default rewrite rules mentioned earlier in the article. If refreshing permalinks through the WordPress dashboard doesn’t work, you can restore the default rules at the .htaccess file level directly.
Step 3: If this is an isolated issue for 1 or 2 pages, double-check that the content actually exists at the URL. If it doesn’t, you can prevent a 404 by redirecting the broken URL to another page or post on the website using a redirect plugin like Redirection.
5. Connection timed out

What does it mean if a connection has timed out?
This error often appears when the site has been trying to load for some time without success. After a while, the server gives up trying. It could indicate that your site doesn’t have the necessary resources available or that your site is trying to execute more actions than your server can manage.
How to fix a connection that keeps timing out
Step 1: Disable all your plugins and see if this resolves the issue. Reactivate the plugins one by one to determine which one of the plugins is the most resource intensive. Query Monitor is a free plugin that will help give some indication of plugins or theme files that are using a large number of resources. If you’re able to disable all of your plugins and can get the admin area to load, install Query Monitor and then activate plugins one by one while watching the reports from Query Monitor. If activating a plugin spikes resource usage, you’ll know which one may be using up your server resources.
Step 2: Switch to a default WordPress theme. It’s entirely possible that heavy code in your theme is using too many server resources. If you switch to a default theme, all of your plugins are inactive, and the issue persists, move to step 3.
Step 3: In the age of CDNs, firewalls, and caching layers, it’s important to understand which layer in the stack is timing out. For example, if you use a service like Cloudflare, it’s possible that your web host is online, but an outage at Cloudflare is causing the time outs, or vice versa. Cloudflare specifically has some great visual indicators for this when you try to visit a website that’s timing out. Your “origin” is typically your web host.
If you encounter issues with connection timeouts and disabling all of your plugins and reverting to a default theme doesn’t resolve it, look for outages at your firewall provider or web host and contact them for assistance.
6. Unable to upload images
Why are you unable to upload images?
If you’re trying to upload images without success, the majority of the time this issue is related to insufficient disk space — meaning that you’re trying to upload files to a server that’s already full.
How to fix an image upload issue
Step 1: WordPress has a great built-in feature to know how much disk space you’re using. You can find this by going to Tools –> Site Health and then clicking on the Info tab.
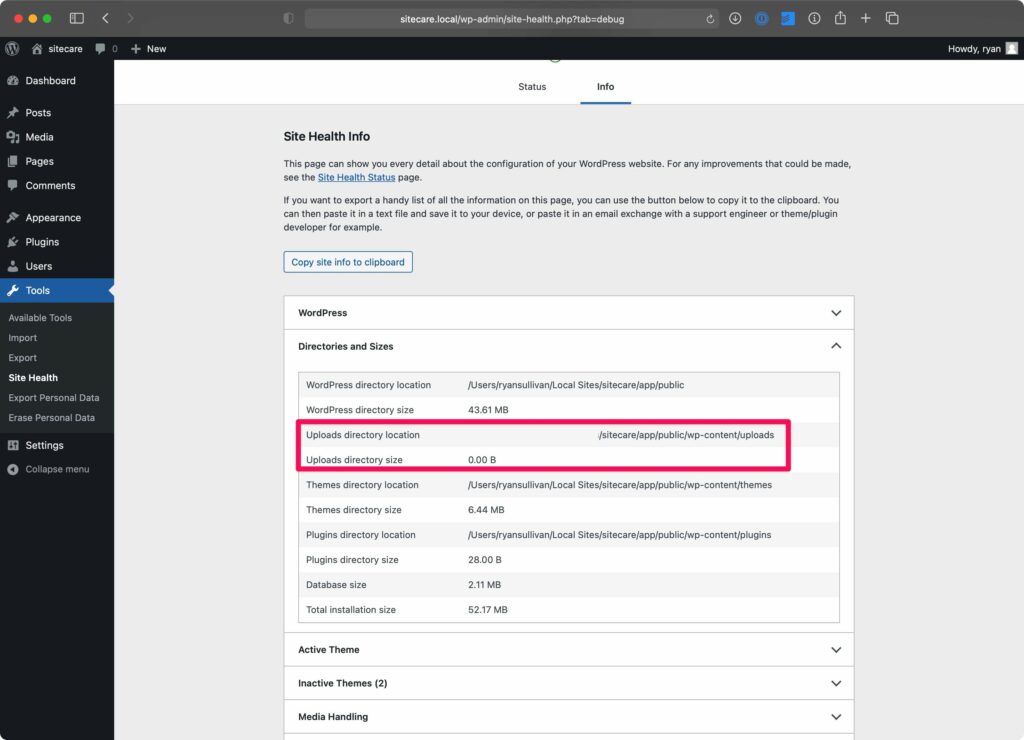
Compare the Uploads directory size to the amount of disk space available from your host. If your usage exceeds what your hosting plan allows, you’ll either need to upgrade your account or remove files from your server.
Step 2: Also within the Site Health area of WordPress is a feature that will help you rule out file permissions issues as a potential culprit.
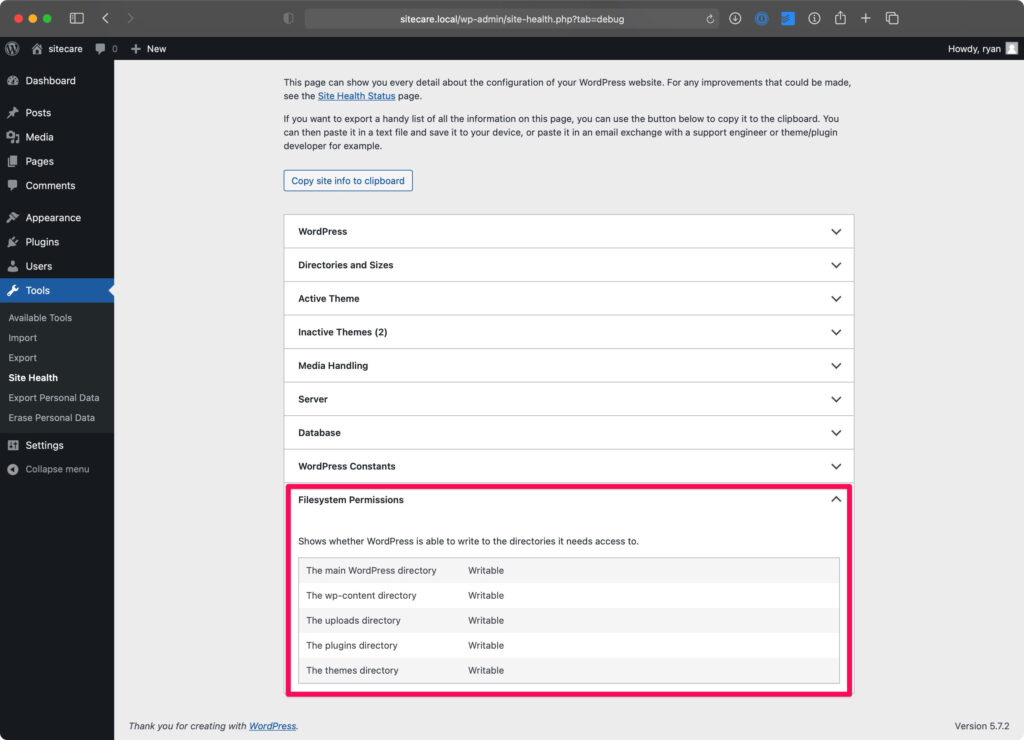
As long as the uploads directory is “Writeable” and you have sufficient disk space, uploading images should work without a hitch. If you’re still having trouble with image uploads, you may need to contact your host or manually reset the file and directory ownership as well as file and directory permissions for the server.
The problem is probably caused by incorrect file permissions that are applied. You may see a message along the lines of “Unable to create directory wp-content/uploads/. Is its parent directory writable by the server?” Luckily, this is a relatively easy issue to fix.
That said, changing file and directory permissions on your server can cause major problems, so only proceed to step 3 if you’re comfortable with file management on web servers.
Step 3: You can reset file permissions by access your site to WordPress’ recommended permissions structure using a file transfer client like Filezilla or Transmit (our favorite). Go to the /wp-content/ folder and find the uploads folder.
Now right-click on this folder and select ‘File Permissions.’ Change the numeric value to 755. Then right-click on this folder and select ‘File Permissions’ again. Change the value to 644, check ‘Recurse into subdirectories,’ and select ‘Apply to files only.’ Click ‘OK’ to apply.
You should be able to upload image files now. If you’re still experiencing problems, reach out to your host for assistance.
Note: Because this is a relatively common problem, many managed hosts give the option to perform this action with a button in the WordPress or hosting dashboard.
- How to reset file permissions at WP Engine
- Change File Permissions of Uploads Directory at Kinsta
- How to Reset File and Folder Permissions at Cloudways
7. Stuck in maintenance mode
Why is your site stuck in maintenance mode?
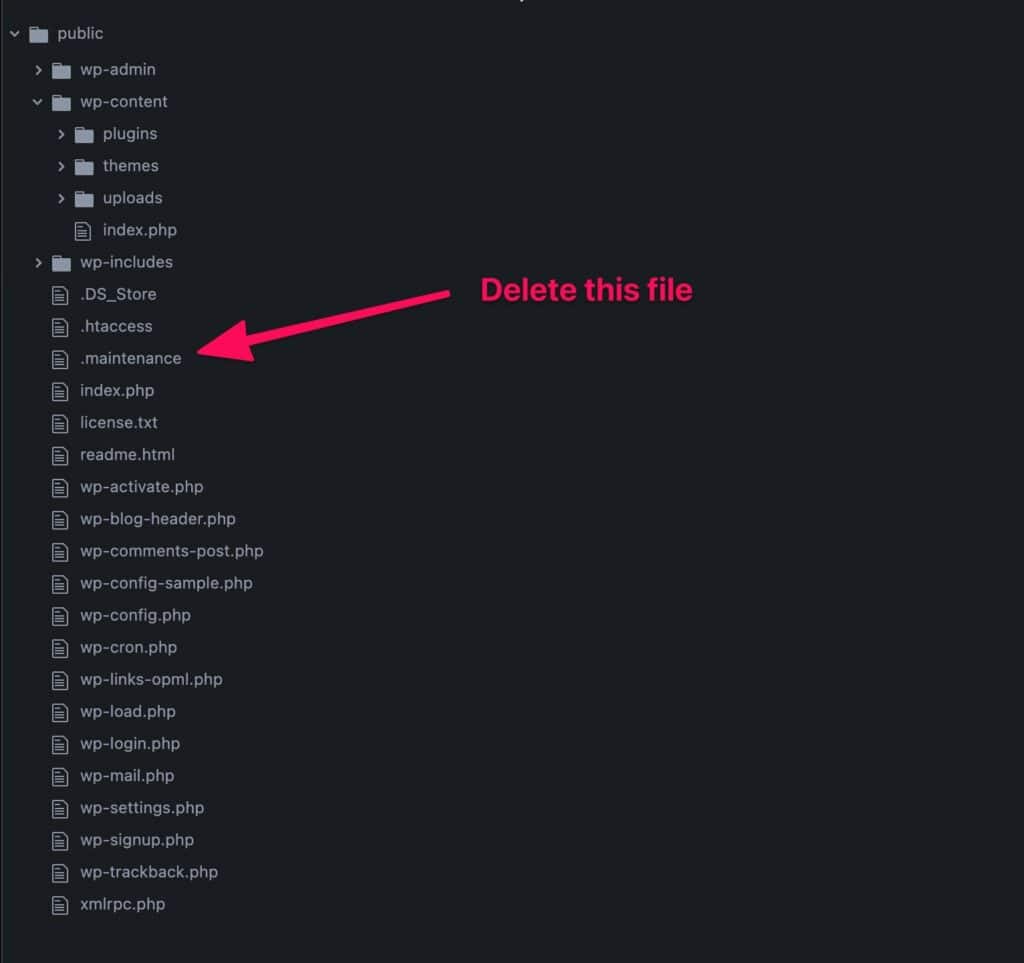
WordPress automatically creates a .maintenance file that temporarily disables your site during a routine updates. If this update is interrupted, WordPress might not remove the .maintenance file. As a result, you’ll keep seeing an error message that states that your site is briefly unavailable for scheduled maintenance. You can fix this by simply deleting the .maintenance file as follows.
How to fix a site that’s stuck in maintenance mode
Step 1: Use your file transfer program to log in to your site.
Step 2: Browse to the root folder of your site and find the .maintenance file.
Step 3: Delete the .maintenance file. Your site should now be back to normal.
Note that you may have to rerun the last update from when the site became stuck in maintenance mode as this error usually means the update was not successful.
We’re here to make your life easier.
That brings us to the end of our list of common WordPress errors for now. The online world is constantly in flux, and things can change overnight, which is why this is a growing list. We’ll add to this troubleshooting list from time to time, so be sure to check back. More importantly, share the common errors you encounter in the comment section below. Our team will consider adding these to the list when we next update this post.
Is it taking too much of your time to make sure your website is functioning optimally? Instead, focus on what you do best running your business and leave your website maintenance needs to our team of WordPress experts. For ongoing support, WordPress website support services can help you resolve errors quickly, improve performance, and keep your site secure.