When you don’t know how to resize an image in WordPress correctly, you’re much more likely to make a bad first impression on your website’s visitors. Images are the welcome mat to your website and can make or break your first impression. Sure, you might have great content, but blurry, poor quality images will chase away visitors before they ever read a paragraph.
It’s more important now than ever to level up your game and spend a little extra time learning how to resize an image properly in WordPress. Images straight out of the camera are very high in resolution and need to be reduced to use on the web. The number one concern for most site owners is page speed. And let me tell you, nothing brings a site to a grinding halt faster than loading oodles of high-resolution images on the regular.
One of the most important performance improvements you can make for your WordPress website is correctly resizing and optimizing your images. The good news? it doesn’t have to impact image quality. Thankfully, it’s easy to learn how to resize an image without losing quality and honestly, it doesn’t take long either.
Why Properly Sized Images are Important for your WordPress Website
Professional-looking images engage the audience, set a mood, and create a better visual connection between your brand and your content. Needless to say, knowing how to resize an image for your WordPress site is an important part of any online presence.
Ok, but how easy is it?
Super easy. As a matter of fact, it’s downright simple. In this post, I’m using Photoshop CC 2015 because it’s what I’m familiar with and it’s what I use every day. If you have an older version of Photoshop, no worries – the steps will be the same overall, but won’t have the newer options that I’m going to talk about later on in the post.
No Photoshop? Don’t fret! There are numerous image editing programs available online like Acorn (Mac), Pixelmator (Mac), and GIMP (Linux,Windows, & Mac). I’ve used Pixelmator extensively and can recommend it for lots of image editing, but almost always end up back at Photoshop for a variety of reasons that aren’t really relevant to this article.
Resizing Images vs. Resampling Images
First of all, let’s talk about what a bitmap image is. Let’s say we zoom in on a JPEG or PNG image. What would we see?
Well, we would see thousands of tiny itty bitty squares, or pixels if I’m proper, that have an assigned color and position that makes up the image. It’s important to choose the appropriate method, resizing or resampling, because each method interacts with these pixels in different ways and affects the overall quality.
The term “resizing” is a pretty typical “blanket” term when referring to changing the size of an image. However, there are two ways to tackle the task of resizing an image in Photoshop – it can either be Resized or Resampled. Which one should you use? I’m glad you asked!
Resizing changes the size and resolution the image will print but does not change the actual number of pixels or data the image contains. Resizing is used mainly for print and is also referred to as scaling. There are only two options here that we can modify – the physical size and the resolution. In Photoshop, when editing one of these values, the program automatically adjusts the opposite value to compensate.
Let’s say we increase the image size by half – the pixels will then spread out and become larger to fill the new space. Increasing the image’s physical size will automatically decrease the resolution by half to compensate, creating a noticeable deterioration in the quality of the image. Of course, if the physical size decreases, the pixels get cozy, squeeze together, and the resolution increases by half.
The options to change the width and height in Photoshop include percent, inches, centimeters, everything except…you guessed it. Pixels. Since the web is pixel-based, this is the ideal option for resizing images for the web.
Resampling, on the other hand, changes the number of pixels the image contains and best used for images intended for the web. Photoshop takes a complex process known as interpolation and makes it as easy as selecting a checkbox in the Image Size Dialog Box. To Resample or….not. In the simplest term, when checking the “Resample” box, you are asking Photoshop to analyze the image and decide where to add pixels when upsampling or what pixels to throw away when downsampling.
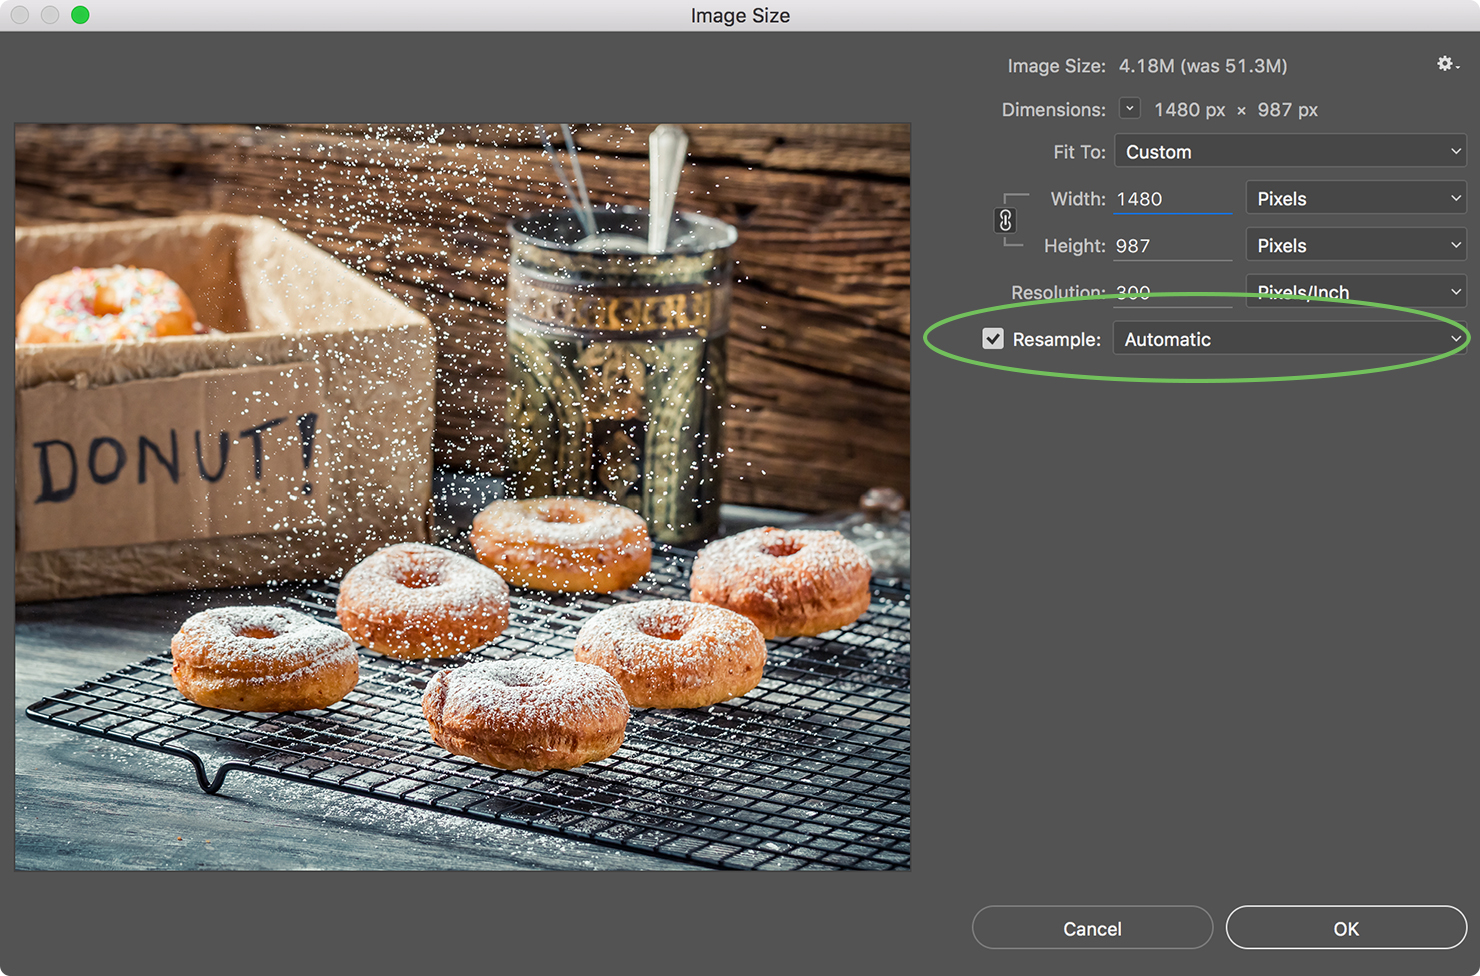
With the boxed checked, the image is being “Resampled” and, with that, the image is being “Resized”. Now with that out of the way, going forward, this post is going to be dealing with Resampling the image.
How to Resize (or Resample) an Image in Photoshop
Let’s begin, and I’ll show you how to resize an image in Photoshop like a boss!
The first thing I always do is make a copy of the image and work on the copy. It’s a real bummer when you’ve resized an image, saved and closed the file, only to upload it to the site and realize that it’s not right – ahem, not that it’s happened to me before. Save yourself some time and frustration and just make a copy. It takes 2 seconds!
Downsample and throw those pixels to the curb!
Here we have the Image Dialog Box. We can change the Width and Height, edit Resolution (because we are sizing for web use, we will keep it at 72), and the Resample menu – set in the screenshot to Automatic. While most of the Resample options are self-explanatory, some are not. It’s a good idea to play around and get a feel for each one and see how they affect the overall image. If it helps, you can find more information from Adobe here.
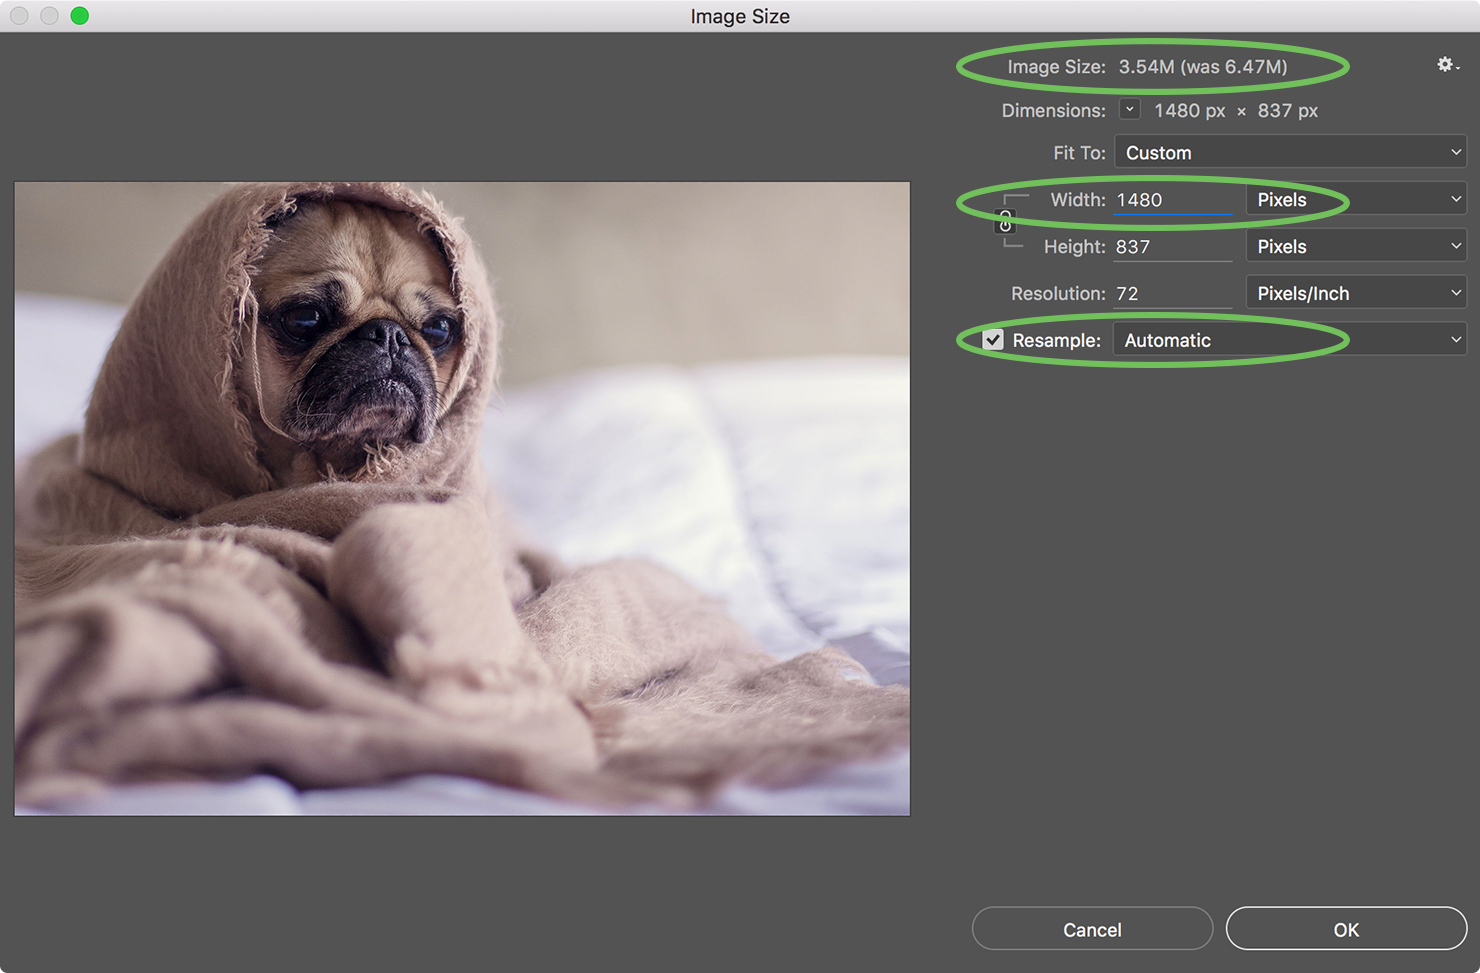
For this image, I used Automatic – but another choice would be Bicubic Sharper (reduction). The image was reduced from 2000px wide to 1480px, and the image size went from 6.47M to 3.54M. That is quite a few pixels removed. I’ll explain the different options available in the drop-down menu a little further on.
Quick note: The Automatic option does not include the Reduce Noise settings because it’s an all-in-one setting. For the most part, it does a pretty bang up job, but for more control and to reduce noise, you’ll want to select and use one of the other settings.
So, let’s take a look at the results.
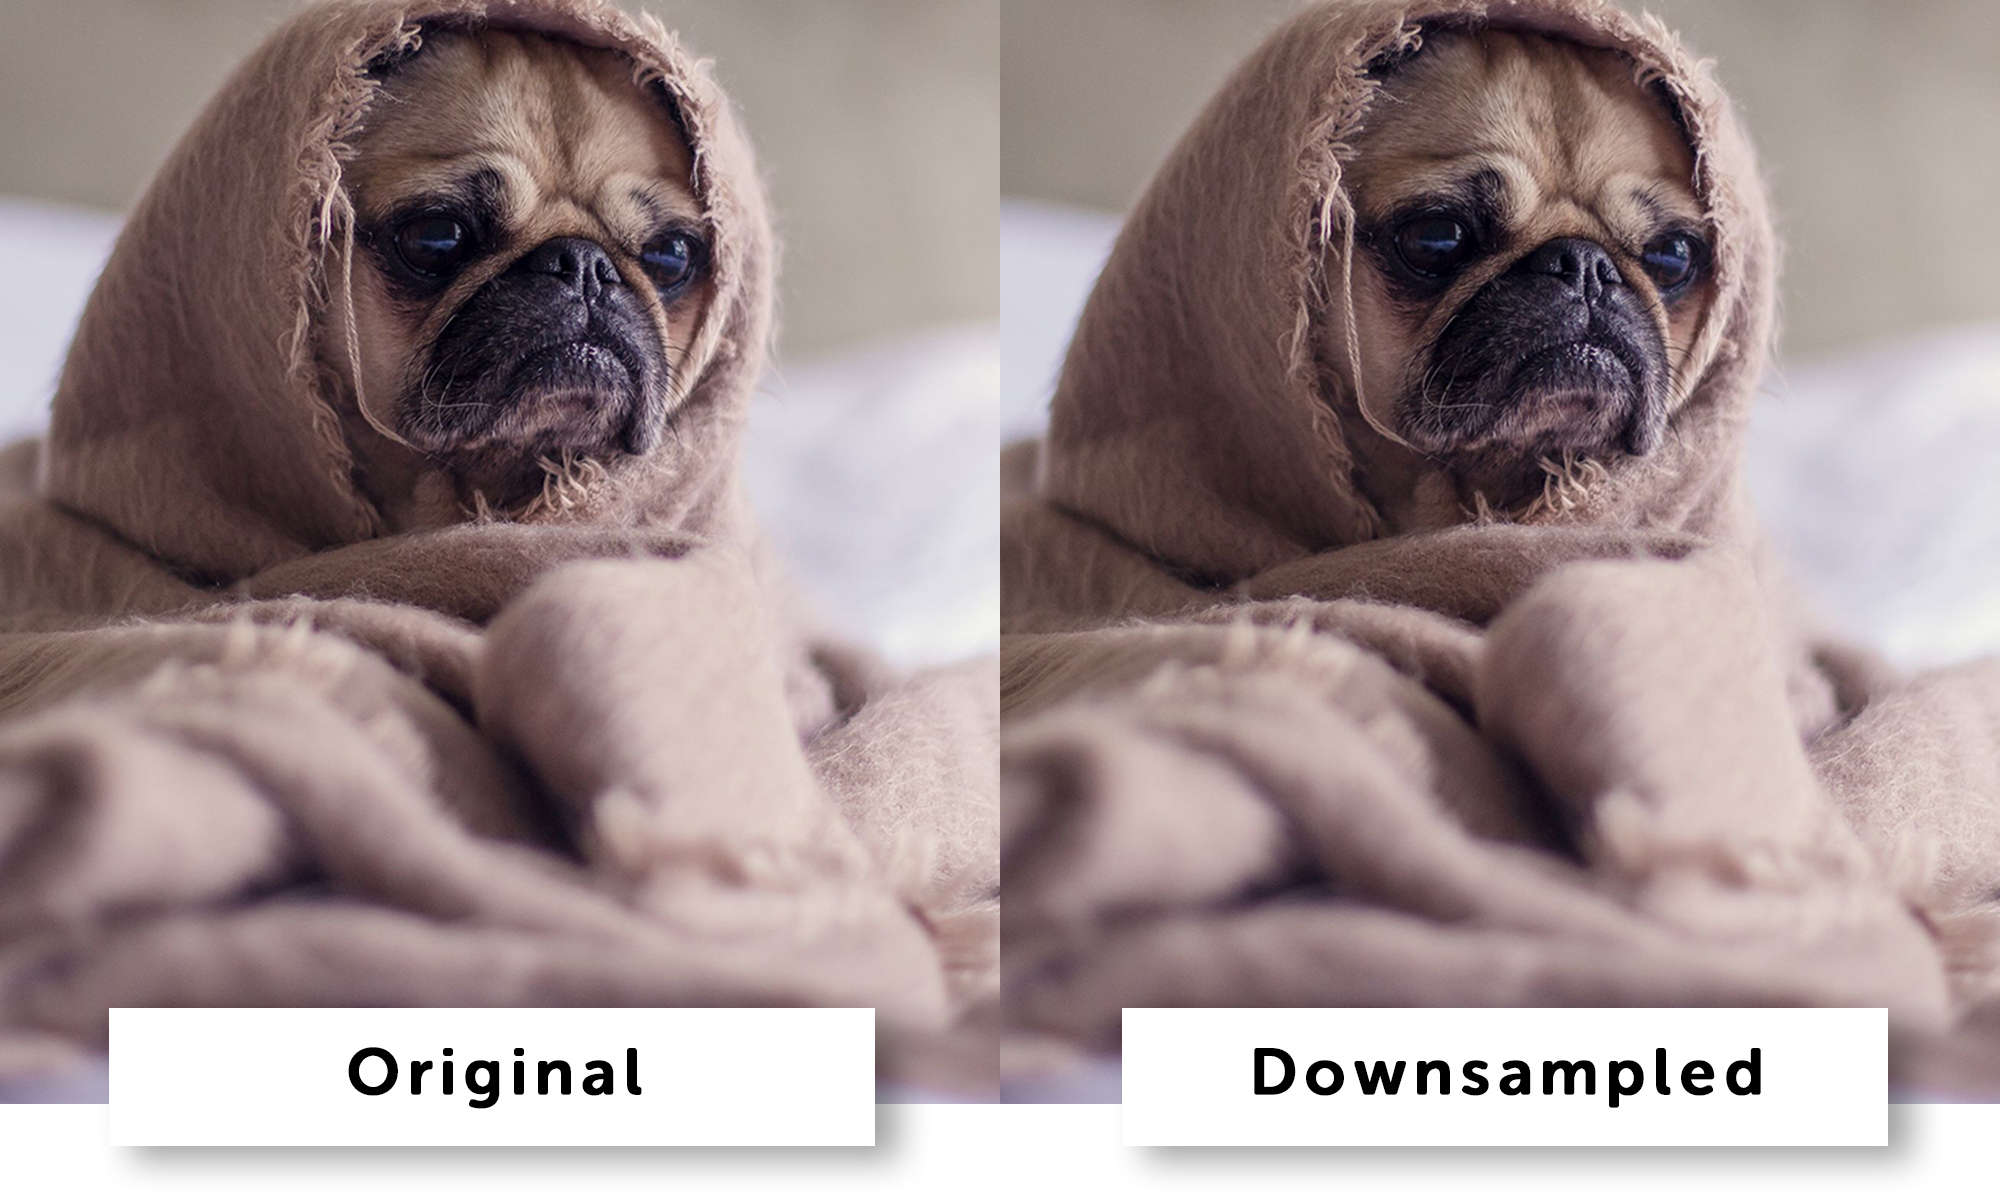
Not bad at all!
The lowdown:
- Original image = 2000x (w) and 881 KB file size.
- Downsampled = 1480px (w) and 545 KB file size.
The particular image wasn’t huge to begin with but it shows impressive results all the same. Still, it demonstrates that resizing an image makes a big difference in the file size, but maintains the quality. That was easy, right? A few simple steps, and done.
Upsampling – making the image larger when starting with fewer pixels
I’ll be honest — I’ve avoided upsampling for a long time. I guess I never fully believed that the quality really would be up to snuff. There are circumstances where you have one, and only one image, and need it to be larger in size. I get that. The truth is that when increasing the image, there will be consequences. It also depends on what you are starting out with; the quality of the original image.
In most cases it’s fine to upsample by double, and moderately triple (again, depends on the original image), but any more than that? NOPE. Don’t do it. I tried tripling a few images in size, and while I was impressed with Photoshop’s ability here, there was a degree of quality lost. There were a few steps along the edges, and a little softness, but that’s to be expected really.
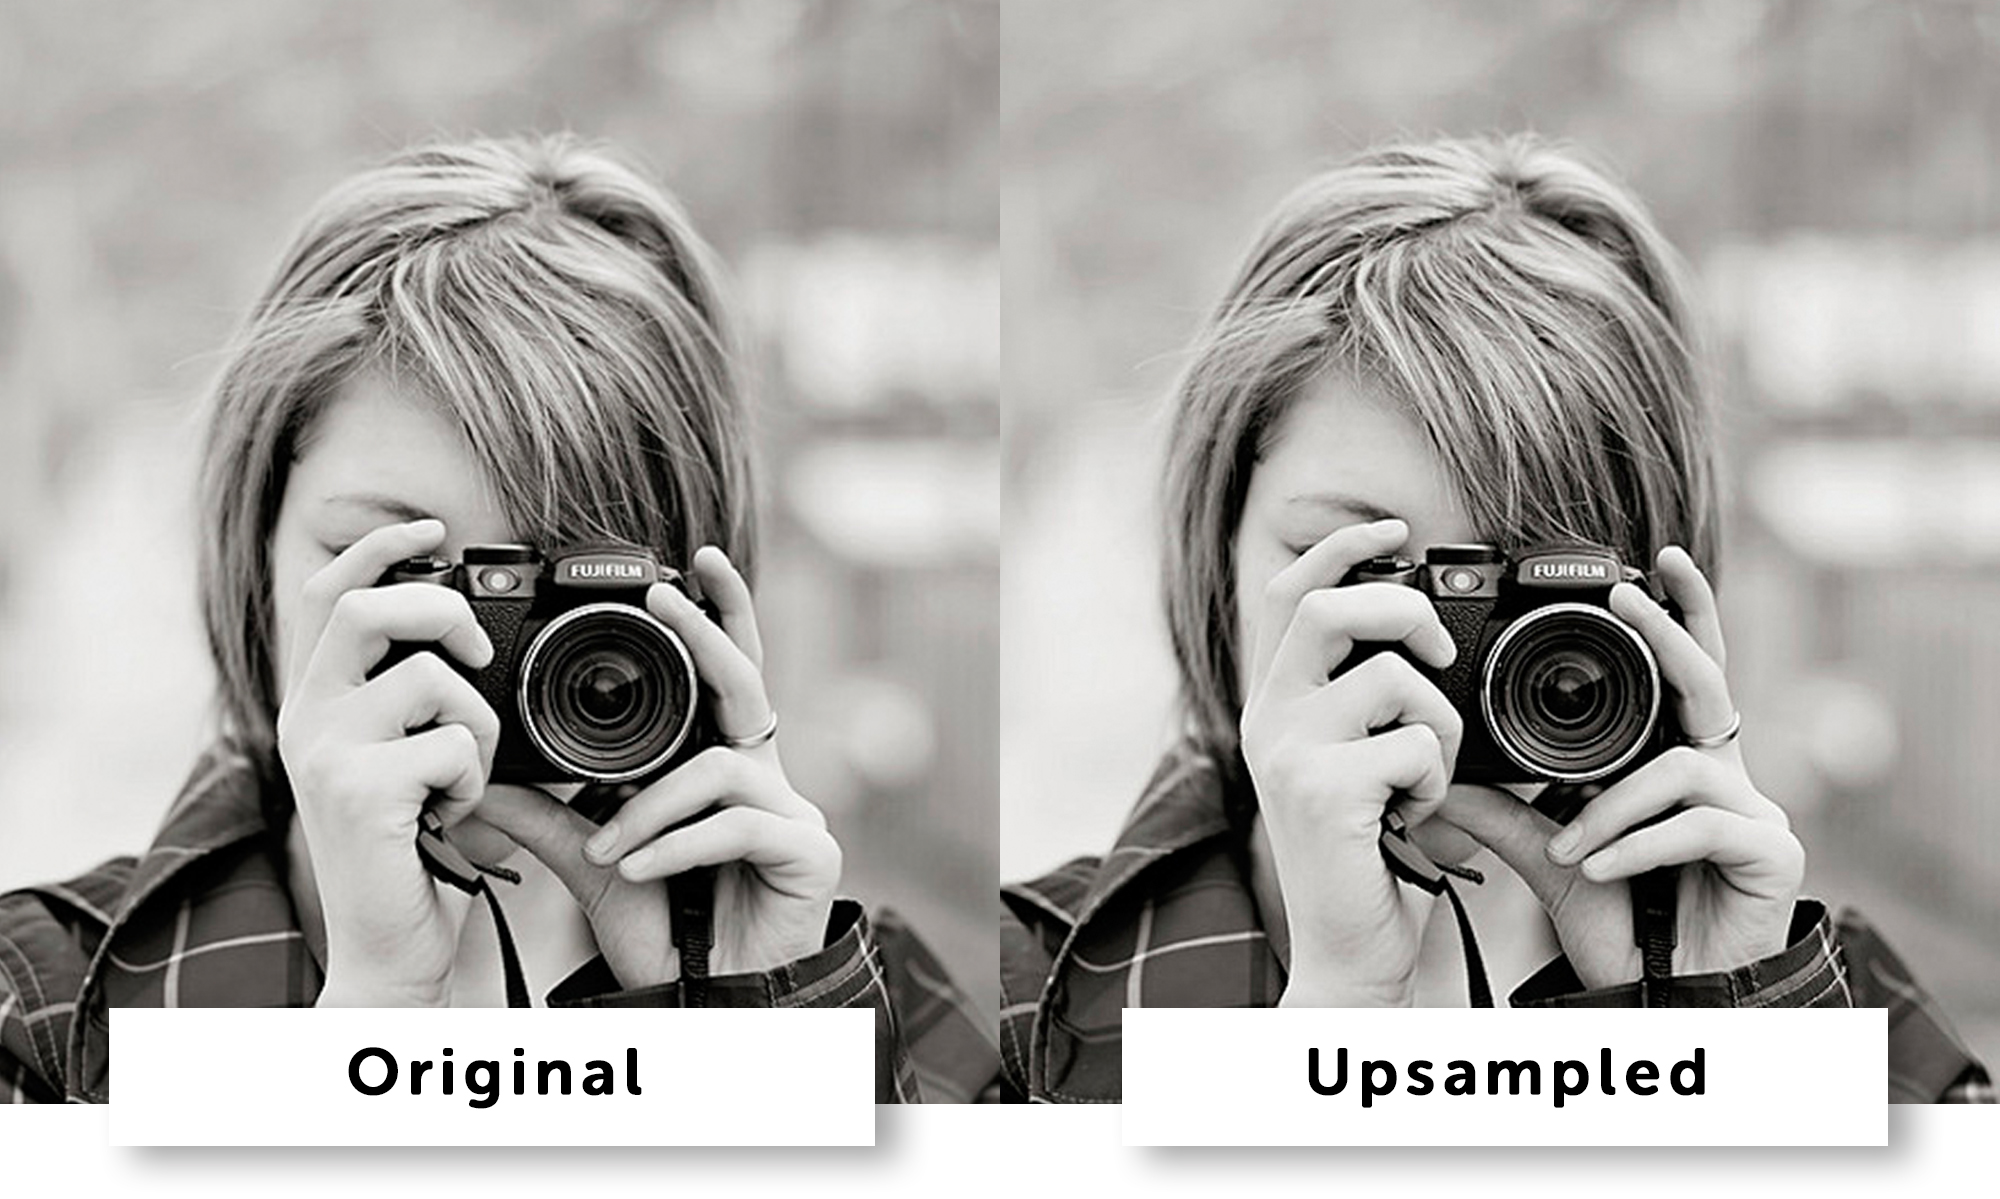
Check out the screenshot below for the best choices for upsampling. You should choose Automatic, Preserve Details (enlargement) , and Bicubic Sharper (enlargement). For this image I used Preserve Details (enlargement), which is my favorite go-to these days. I added 10% Noise Reduction as well. The original image is 800px, and I increased it to 1480px – this increased the image size from 1.21M to 4.15M.
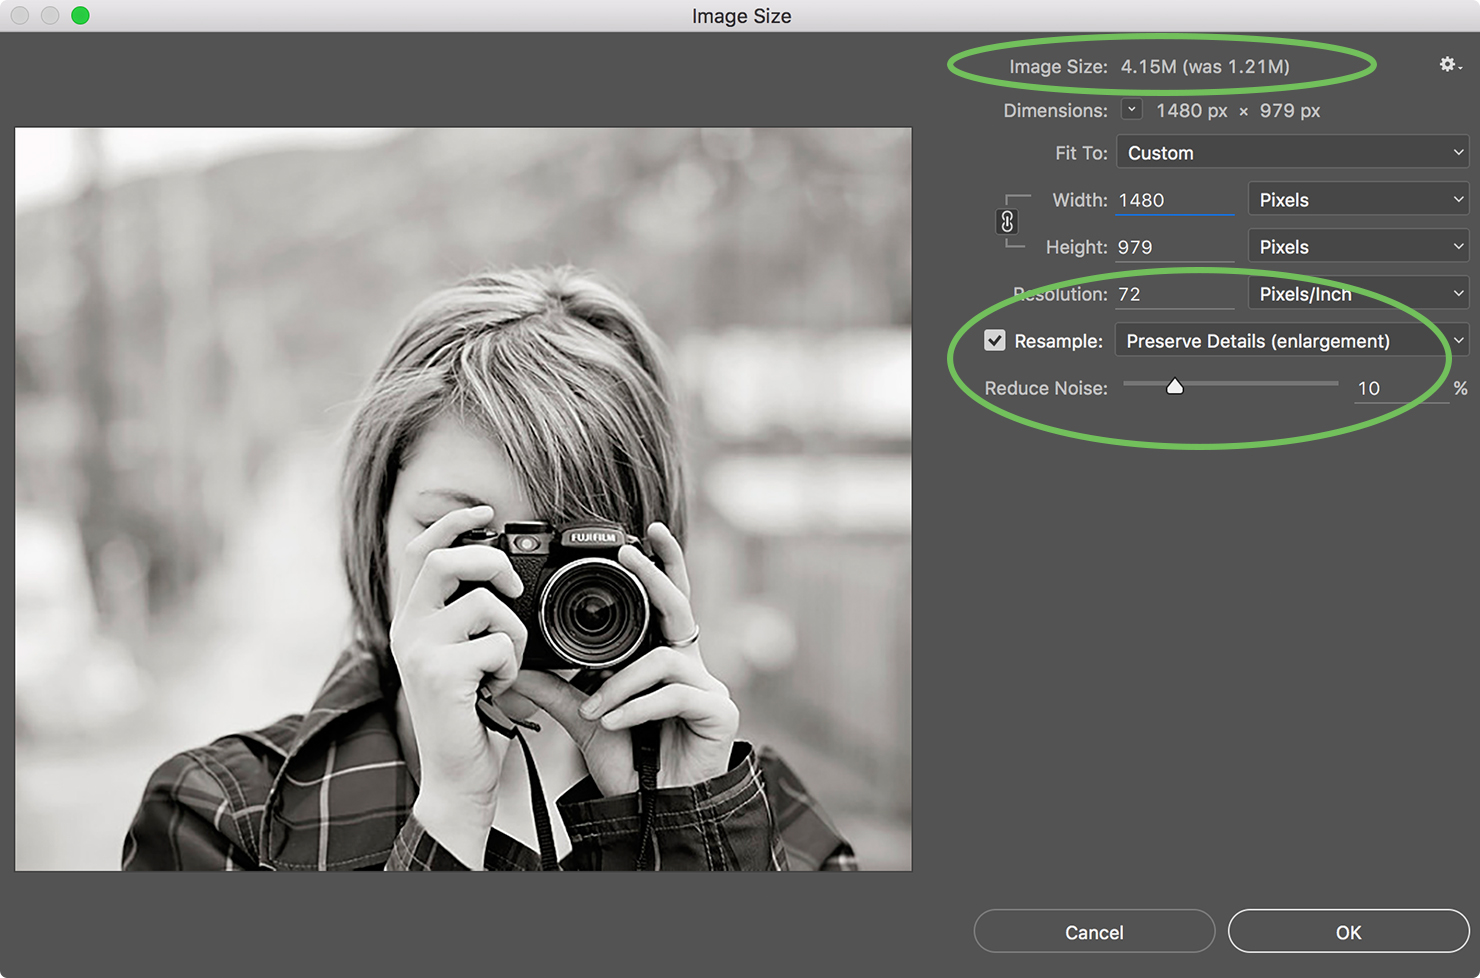
The results?
Exporting Images from Photoshop
The last step is saving the image for the web, which further optimizes the file size and prepares it for the web. You can do this by choosing File –> Export As.. from your Photoshop menu.
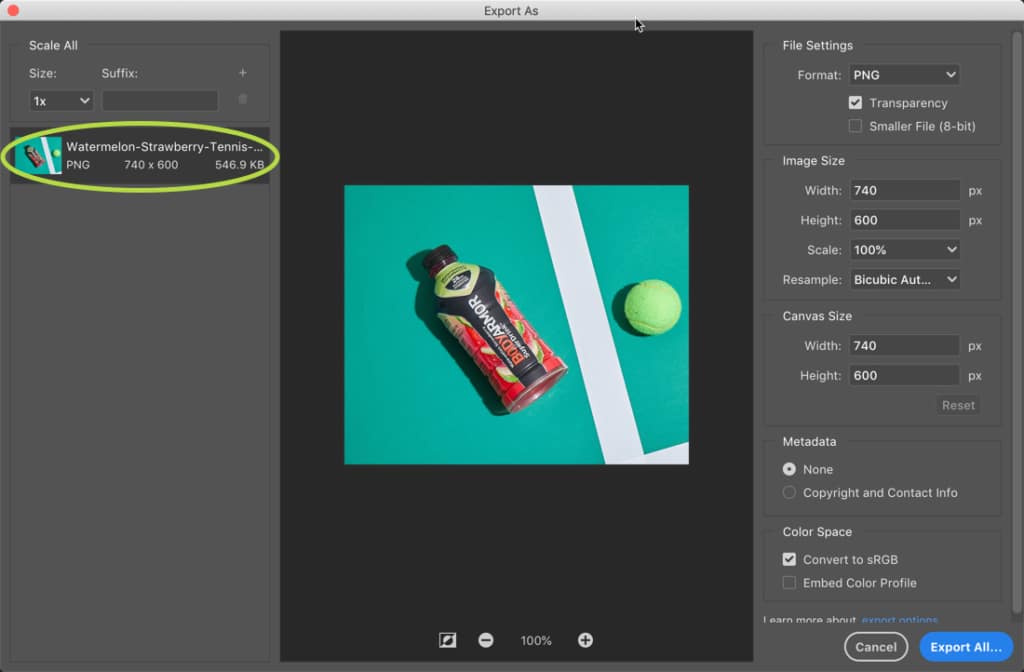
Our initial image in this example has a file size of 546.9 KB, which is pretty good, but we can do better. Most websites shouldn’t have a total page size of more than 3MB (3072 KB), so we don’t want to use up over 500KB for one single image if we can help it.
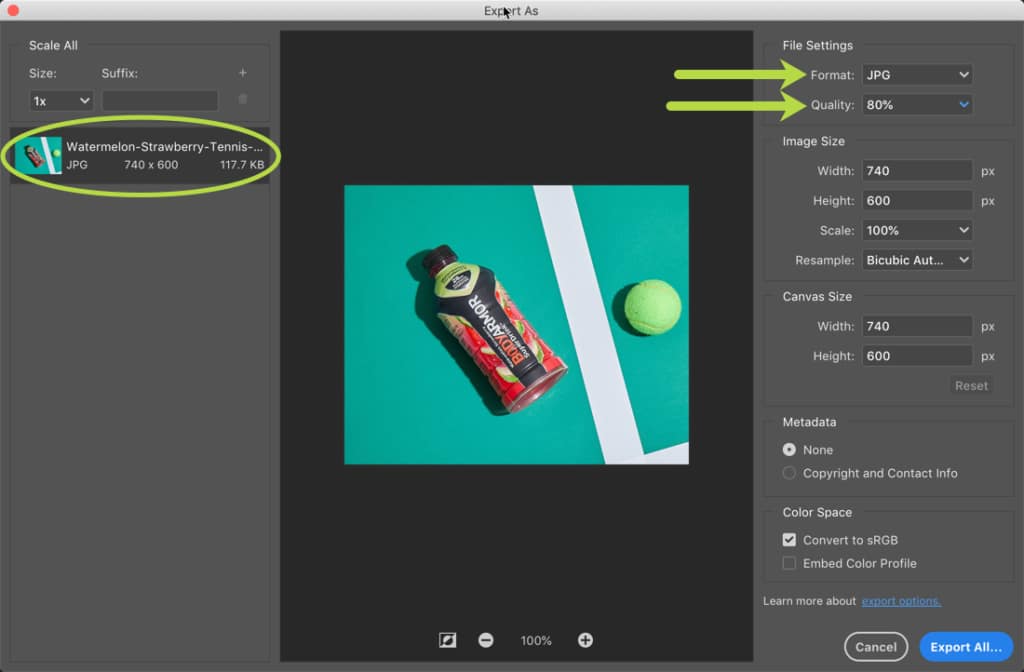
By making a few small adjustments, we can decrease our image size by 400% without any noticeable quality loss. By changing the image format to JPG and reducing the Quality to 80%, our image is now in great shape for the web!
WordPress Tools for Image Optimization
If all of the above seems a little bit cumbersome, there are tools available directly in the WordPress CMS that can streamline this a bit and take image optimization even further.
To be clear, you won’t get the granular control you will with Photoshop. These tools are definitely more blunt. But they handle image compression and resizing on the fly without being depending on another piece of software.
Here are some of the image optimization tools we see being used on most of our client sites.
- ShortPixel Image Optimizer – free image optimization with a premium service for bulk optimization and more fine turn control
- EWWW Image Optimizer – a free image optimization tool that is sometimes limited by server restrictions on your hosting account. Great free option of your host can accommodate it.
- Imagify – Imagify is a premium image optimization service from WP Rocket’s creators. It’s our preferred image optimization tool and is mentioned in our Best WordPress plugins article.
- Smush Image Compression – made by the team at WPMU Dev, another image optimization tool that shows solid results.
Resizing Web Images for Use on Retina Displays
Ah, yes! It’s also important to know how to resize an image for Retina Displays. Why is this important? Because Retina Display squishes more pixels into the screen than that of a regular display. To ensure that images look great on both retina and non-retina displays, you’ll want to save your image at double the pixel dimensions. For example, in this post, the maximum pixel width for images on our site is 770px, so I’ve saved them at 1540px, and they appear nice and crisp on every display.
You might be wondering about the resolution at this point – and it can stay at 72. DPI refers to “dots per inch” and is generally used to determine the size an image will print. Since we are only concerned with pixels, because the size of a web image is determined in pixels, anything more than 72 will make absolutely no difference in the quality of the image.
Once your images are resized, you need to consider that they need to be responsive for mobile devices. There is nothing worse than when an image overlaps onto content and throws out the formatting. Luckily, WordPress has a solution for this: it automatically makes images responsive so you don’t have to worry about them.
How WordPress Automatically Makes Your Images Responsive
Nothing sucks more than an image that takes forever to load. Or an image that doesn’t fit on your phone’s screen. Just because that image is larger than it needs to be.
Lucky for us, there’s a new feature in WordPress that automatically handles this.
WP Radius’s founder, Brandon Yanofsky, wrote an article diving into the details of this new feature: How WordPress Automatically Makes Your Images Responsive.
The New Responsive Image Feature
In the simplest terms, WordPress and your browser find the optimal image for the device you are using. Both for size, and resolution (such as on retina displays).
The coolest part is that all you have to do is upload your images just as you were doing before. WordPress works its magic to make sure it loads an image that is just the right size.
That means no more images that are so large that it takes forever for them to load.
Again, this all happens automatically. But if you’d like a basic understanding, keep reading.
Curious How It Works?
Whenever you upload an image, WordPress saves a few different sizes. You may have seen them before when inserting an image into a page or post: thumbnail, medium, large, and full-size.
With some special HTML code, the browser first figures out what size image it needs to load. It then loads one of the existing images already uploaded to WordPress that matches the size.
So, for instance, let’s say you upload an image that is 3,000px by 1,000px. When you view that image on a phone, it only needs to be 300px by 100px. So, the browser will load the medium size image (which is exactly 300px by 100px).
But, what if you load the image on a desktop? The image now needs to be 1000px by 334px. So WordPress will load the Large size image (1024px width).
Resizing Images: Closing Thoughts
There you have it! Now you know how to resize an image properly for your WordPress website.
Image quality does not have to be compromised when you know how to resize an image in Photoshop properly. The process is pretty slick and quick once you have the know-how. Honestly, it’s taken you longer to read this post than it will take to prepare those gorgeous images.
And, with WordPress, it is automatically made responsive, and because it is all automatic, you don’t need to understand what is going on. Just upload images that have been resized, and WordPress will take care of the rest. If you ever need help fine-tuning your site’s performance or tackling more advanced challenges, partnering with a WordPress support company can make the process even smoother.


21 responses to “How to Resize an Image in WordPress Without Losing Quality”
Thanks for this awesome, in depth look at resizing images. Have you seen Imagify? It apparently with resize all of your images at once on your WordPress site without looking quality. This is similar to Smush.it – and it was discovered by a client of mine who needed a solution for handling existing images.
Thanks for covering images for Retina displays. Most people forget to do that for Retina users.
I don’t like to use image optimization plugin, I think if you are going to add one or two images in each blog post, use online image optimization service. It takes few seconds to optimize your images, I have used many online image optimization services and compressor.io/compressis best. I am not affiliated with them just a happy user. 🙂
I gave up doing any edits to my images. Now all I have to do is upload and publish. Thank you, Image Foo. They create each image for me and deliver me the correct sizes and they compress for me. Now all I have to do is think of a good alt tag! Such a stress reliever!
The whole retina thing is extremely odd. Every website out there says you need to have sites load faster for mobile devices than for desktop (including Google Page Speed). Yet, mobile devices need images to be at least 200% larger than desktop screens in order to look good. This means those same images will take longer to download on mobile devices than on a desktop, which in turn penalizes your speed ranking. It’s ridiculous.
For resize I usually use Paint. Yeah, that’s true.
For optimization I prefer use third-party services like Kraken Web Interface. But if I’m lazy just upload and use EWWW WordPress plugin for handle it.
Thank you for sharing such a brilliant article about resize the image, But as of i know when we insert the image on website (or) webpage, we shouldn’t resize the images by using html code. This will not be good to make it as a SEO friendly Website.
I’m not sure I follow the info regarding image size for retina display. When I save my photo at twice my blog’s max pixel width, it doesn’t fit into allotted space. How does your photo not get cut off when you post? Is there a trick to it that I missed? I am using Blogspot/Blogger, not sure if that makes a difference. Thanks in advance!
Thanks for a good lesson about how to make the good quality of an image.
Thanks for sharing brilliant article. As you can see most of people want image resizer tool which fulfill their desire toward perfect and high quality images to save memories. You have represented the whole concept very precisely. Great work.
Thanks for writing a fantasticly easy to follow article on how to resample a photo.
I so needed this (anyone can do this) type of how to article for my sanity.
Yes! Thank you for creating it!
Exactly what I needed Krista! Thanks a lot for sharing. But what if we don’t have Photoshop? are there any online tools we can use?
I have made a similar video on how to compress bulk images with out loosing quality.
https://www.youtube.com/watch?v=r4OTU8GNhh0
This is a really good and more necessary idea that you have described properly about how-to-resize-an-image. I have more benefited from this post. thanks a lot for this best article.
I have tried this also nice article. I’m also using PhotoViewerPro it’s very handy for photo editing
Hi,
I want to share my experience using a wonderful image compressing and optimizing tool.https://way2enjoy.com/compress-png a png/jpg/gif image compressor which allows you to compress 50 files at one go without any restrictions.An image usually comprises of the 80 % of the total KB.Here you can shrink your image by 70-80%.Also I found that you can avoid the use of plug ins and hence can make your website faster than any other.
You can also reduce your ppt size in the same way without affecting the quality of the image.Colors can be replaces or changed using the existing colors of the image.Surprisingly i found that it makes no changes in the look of the image.
In case you want to resize your image and shrink its percentage by your choice you can also do that by using the link https://way2enjoy.com/resize-image. You can reduce it by 10%,20%….and so on as per your choice.
Hope this information serves your purpose and you enjoy a faster way of compression and optimiziing tool.
Photoshop is my best tool ever used to re-size images. In the latest version of Photoshop Content-Aware with Crop Tool, An amazing solution to re-size images without losing pixels or quality. This is an automated process even though we need a bit retouching after it. There are many tutorials available for exporting this.
Photoshop is the best tool ever used to re-size images.Smushit is also good plugin for image resizing. Thanks for your sharing.
A lot of the points focus on the images element of content. Images are a large aspect of page speed which is another ranking factor of google.
Thanks for this awesome, in depth look at resizing images. Have you seen Imagify? It apparently with resize all of your images at once on your WordPress site without looking quality. This is similar to Smush.it – and it was discovered by a client of mine who needed a solution for handling existing images.
Thanks for covering images for Retina displays. Most people forget to do that for Retina users.
Hello ,
Image resize is an important task . I have learn more from your blog about it . Thank you for shared .
image resizing is a important job . Its also useful for me and i was finding such tutorial . Thank you for this post .